Android App Shield
Introduction
Quixxi App Shield is usable by enterprises, mobile app developers to secure their mobile apps from piracy, revenue loss, IP theft, loss of user data, hacking and cracking. Quixxi App Shield ensures your application is fully protected with our multi-layered encryption engine that prevents your application from being reverse engineered and tampered with
Salient features
Quixxi App Shield for Android:
- moves hardcoded strings and methods calls to the native low layer, replacing both of them with gibberish values which will prevent the business logic understanding
- is applied with a simple drag’n’drop, so to achieve a fast and codeless integration
- provides support also for Android libraries
Steps to apply Quixxi Security to an Android app
Optional but highly recommended
In order to achieve a higher security level we strongly suggest to obfuscate the code before applying the Quixxi App Shield. If you use ProGuard – the Android Studio’s inbuilt tool – please make sure to add the following line to your ProGuard file:
-keep class com.quixxi.** { *; }
Please follow the steps below to protect your Android application with Quixxi Security
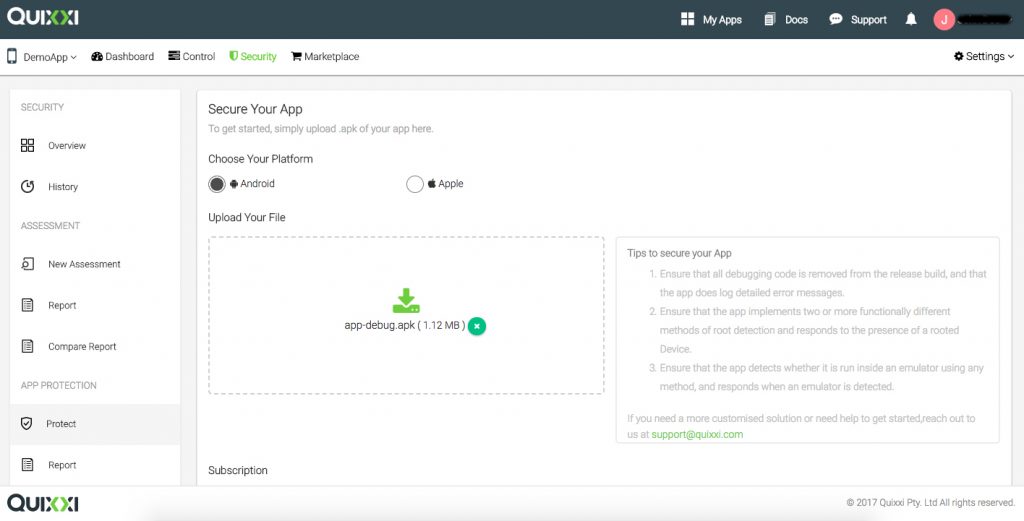
- Create a new app in Quixxi Portal using the “Add New” box
- In the “Create your app” dialog give a name to your application and click “Continue”
- Click the newly created app and choose “Shield” tab in the header bar
- Drag and Drop your APK file and click on “Next”
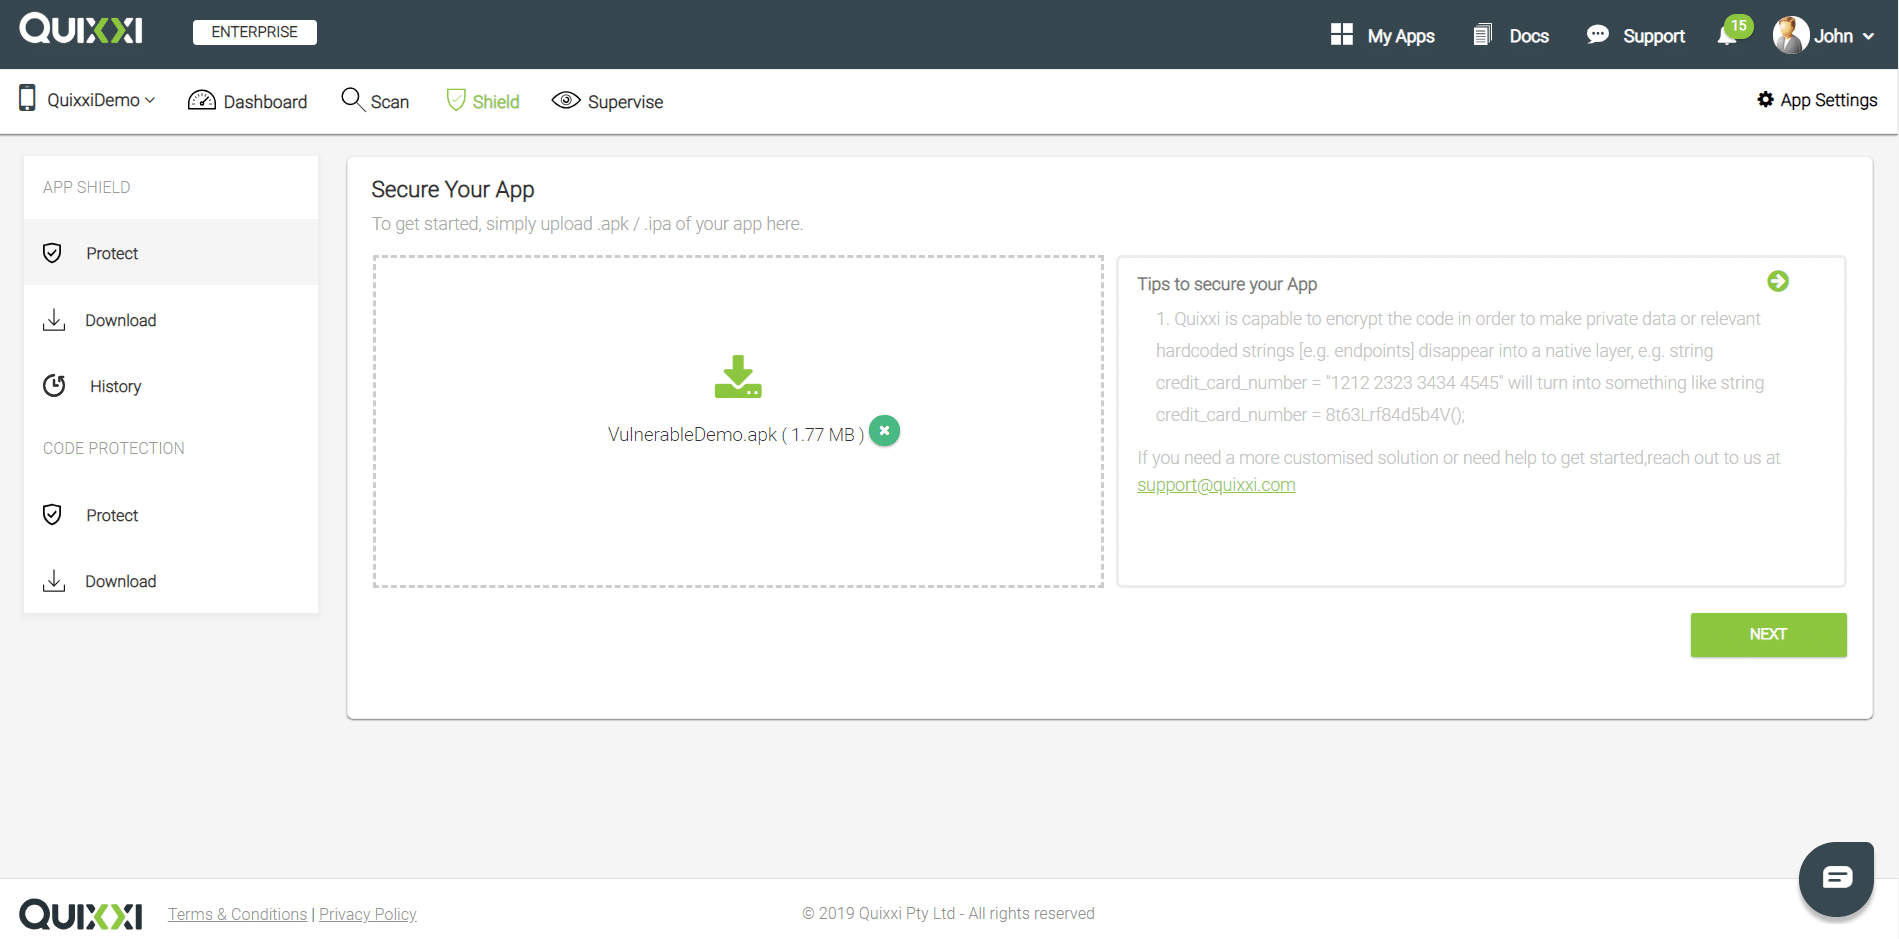
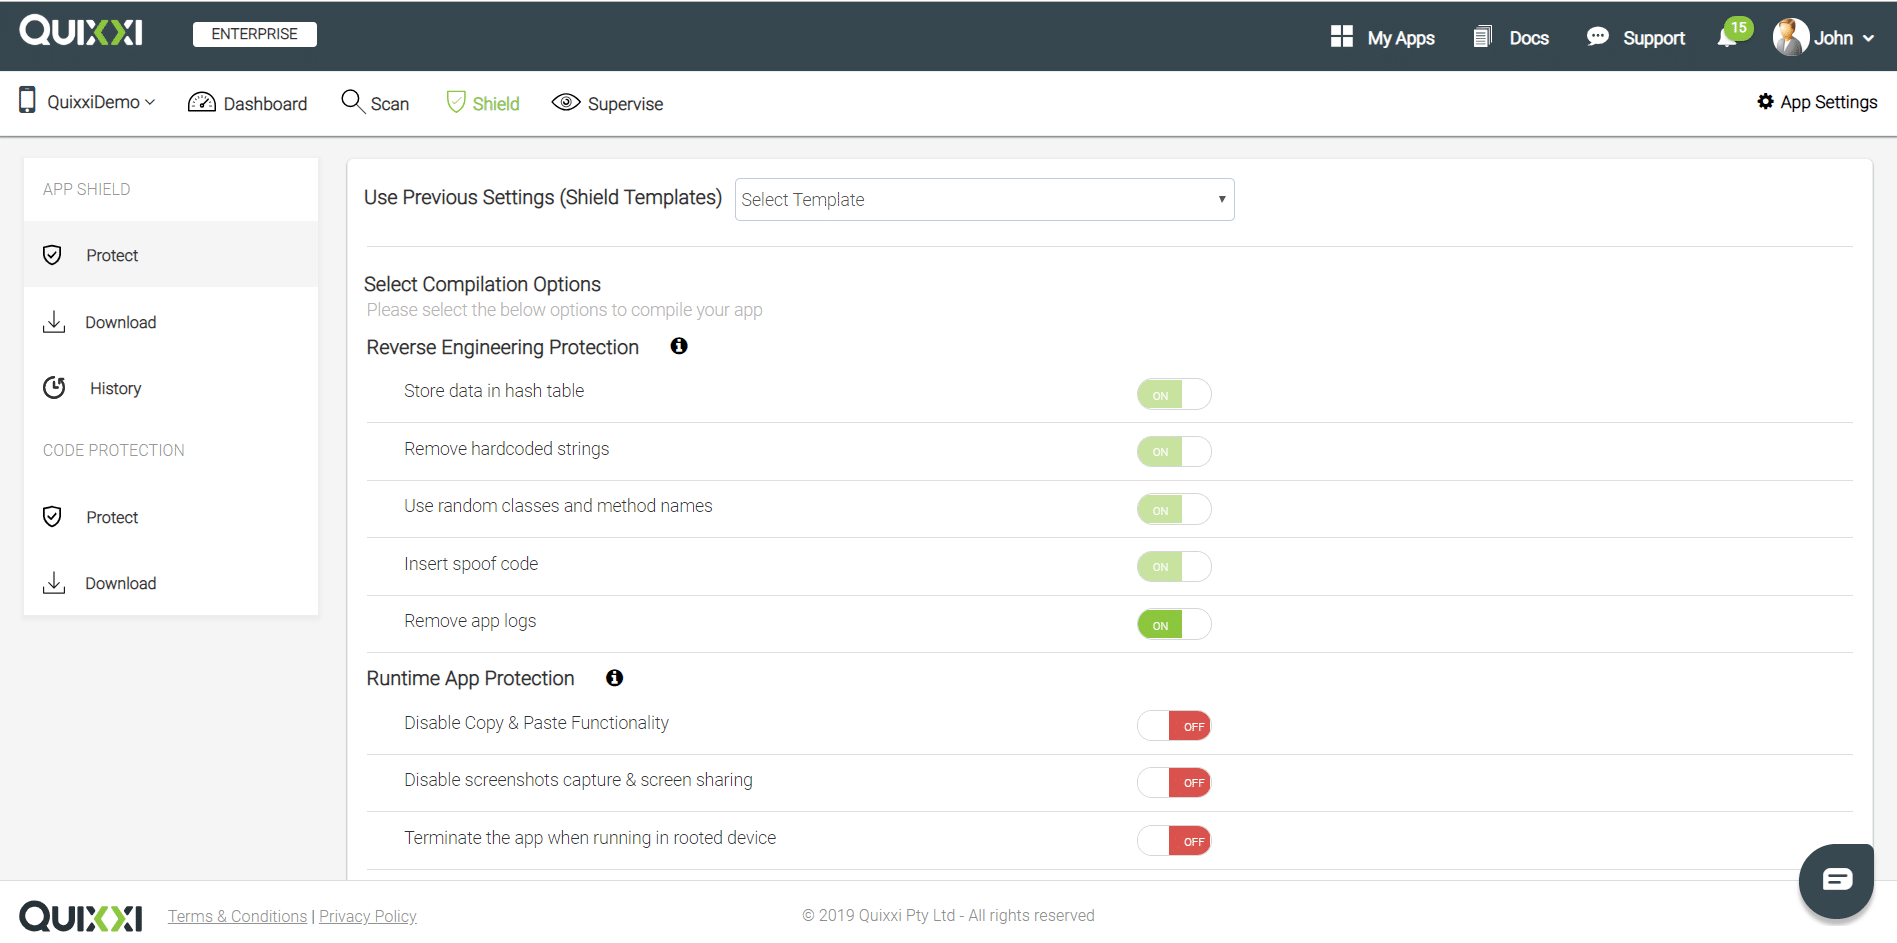
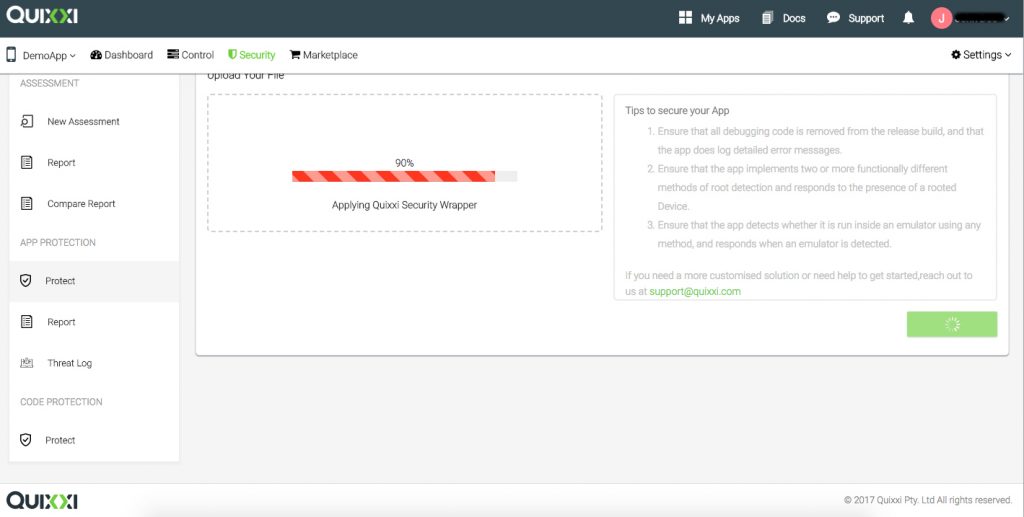
- Now start configuring the security options according to your needs. You can find their detailed explanations here. Once done please click on “Next” to start protecting your app
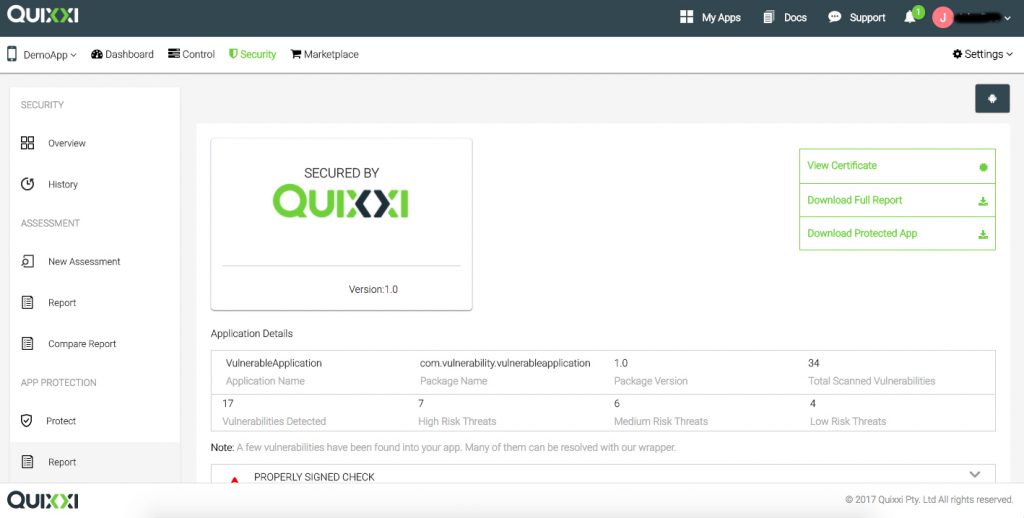
- Once the compilation is over you will be redirected to the “Download” section. Your protected app will be available clicking on “Download Protected App”
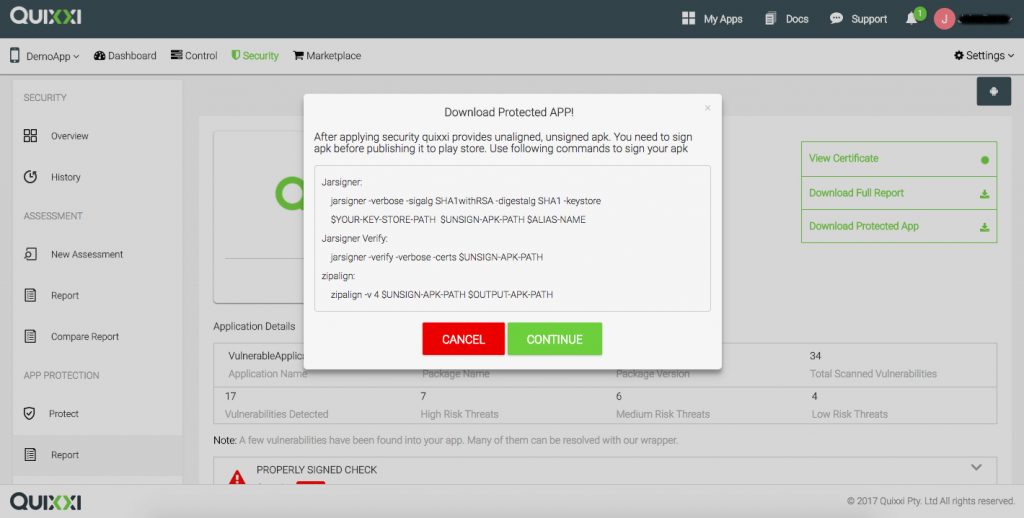
- If you decided to sign the apk locally instead of using the automated signing procedure while applying the Shield you MUST now sign the downloaded apk file to have it working on mobile. You can find the detailed manual signing procedure here
- For Android apps only we offer a procedure to quickly get a debug version of your protected apk. This version is already signed with Quixxi debug.keystore, so it will be perfect for a test but not accepted on PlayStore. This version is available clicking on “Download Debug Signed”
Android Shield options description
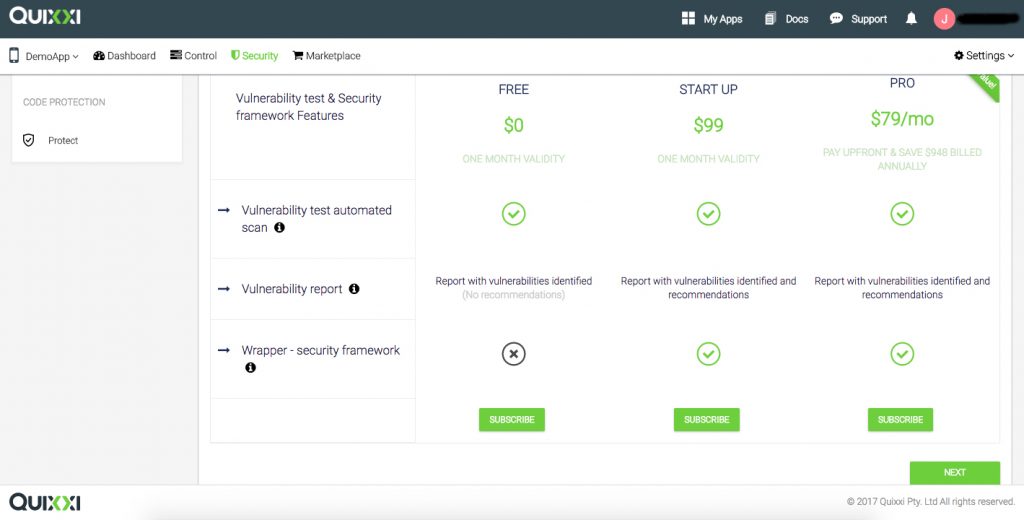
Quixxi Shield is available only for plans that are equal or superior to the Pro one
IMPORTANT – in all the options involving the app termination please bear in mind that the final user will NOT be notified about the specific cause for security reasons, so use the options wisely
Reverse Engineering Protection
Store data in hash table
This option is set to ON state by default and can’t be modified. If this option is ON, Quixxi Shield will use the hash table technique to store the strings and other values used by Quixxi
Remove hardcoded strings
This option is set to ON state by default and can’t be modified. If this option is ON, Quixxi Shield will remove the hardcoded strings available in the apk and store them in the native layer. Quixxi Shield will also encrypt the keys to retrieve the strings stored in the native layer and automatically add the decryption logic
Use random classes and method names
This option is set to ON state by default and can’t be modified. If this option is ON, Quixxi Shield will remove the hardcoded strings available in the apk and store them encrypted in the native layer. Quixxi Shield will automatically manage the encryption keys and add the decryption logic
Insert spoof code
This option is set to ON state by default and can’t be modified. If this option is ON, Quixxi Shield will add spoof code to the app. This will increase the complexity to identify and understand both the pure business logic and the added security layer actively protecting the apk
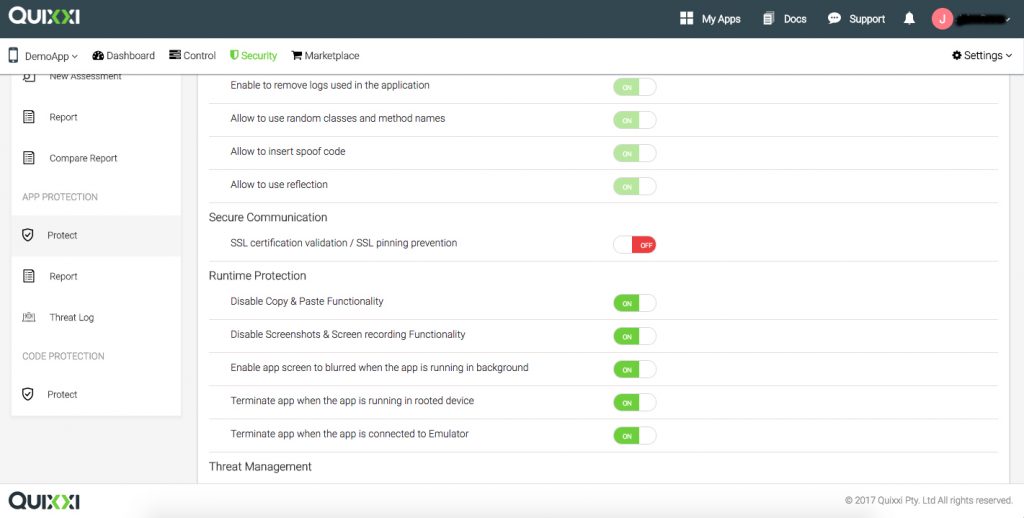
Remove app logs
This option is set to ON State by default and can be modified. This option applies ONLY to native apps. If this option is ON, Quixxi Shield will remove the logs used in the app that might favor hacking attempts. Logs include the output due to Log.i(), Log.d(), Log.v() and System.out.println() calls
Runtime App Protection
Disable copy & paste functionality
This option is set to OFF state by default and can be modified. This option applies ONLY to native apps. If this option is ON, Quixxi Shield will search the EditText elements in the app. When found, Quixxi Shield will insert the logic to prevent copying and pasting the content, both within and outside the app
IMPORTANT – the copy and paste protection applies ONLY when the copied content is taken from EditText elements
Disable screenshots capture & screen sharing
This option is set to OFF state by default and can be modified. If this option is ON, Quixxi Shield will insert the logic to prevent the app user from taking screenshots and performing screen sharing. If the user will try to take screenshots then a “Couldn’t capture screenshot” message will be prompted. Instead, if the user will try to share the screen he will get a total black screen for the mirrored one. Moreover, this same option will blur the app preview when the app is put in background
Terminate the app when running in rooted device
This option is set to OFF state by default and can be modified. If this option is ON, Quixxi Shield will insert the logic to terminate the app when executed in a rooted device. This option can be used to stop the app regardless of the store from where it was downloaded and installed
Allow apps installed from Google Play, Samsung and Amazon stores to bypass the root protection
This option is set to OFF State by default and can be modified only when the previous “Terminate the app when the app is running in the rooted device” is ON. If this option is ON, Quixxi Shield will insert logics to terminate the app exclusively on those devices which did NOT install the app from Google Play, Samsung or Amazon store
IMPORTANT – This option must be chosen VERY carefully. We introduced it to let all the customers who downloaded from safe markets use the app on rooted devices. This is extremely important for paid apps, because customers who are denied the access after a regular purchase can destroy its reputation on the markets. On the other side please consider that the possibility itself to run the app on rooted devices – even though only under controlled conditions – will make you fail advanced security assessments, especially if the data handled by the app are sensitive [as in fintech, healthcare, etc.]
Terminate the app when connected to the emulator
This option is set to OFF state by default and can be modified. If this option is ON, Quixxi Shield will insert the logic to terminate the app when it is running on the emulator
Integrate Malware Detector SDK
This option is set to OFF by default and can be modified. If this option is ON, Quixxi Shield will add its malware detection modules into the apk. Signature based malware detection option will be enabled by default and developers will decide if adding also the Machine Learning based malware detection. The anti-malware modules will be launched upon every app start
Signature based malware detection
This option is set to ON state by default when the previous “Integrate Malware Detector SDK” is enabled and can’t be modified. If this option is ON, Quixxi Shield will integrate in the apk our signature-based malware detection. As its name says, this technique checks against an updated list of known and dangerous Android signatures
Machine Learning based malware detection
This option is set to OFF state by default and can be modified. If this option is ON, Quixxi Shield will add also an ML-based malware detection engine to the apk. In this case detections are predictions based on the features and the APIs used by the application under test. This second approach is restricted exclusively to apps that were NOT downloaded from Play Store, Amazon or Samsung stores
When Malware is found in the device
Developers can decide which action needs to be performed when a malware is detected on the device:
• Private report – Malware details will be posted to Quixxi portal, without communicating anything to the user
• Warn the User – Quixxi Shield will show a notification to the affected users and they can view the list of malwares detected by the Shield. Users will be able to continue using the app despite the detections if they want
• Stop the app execution – Quixxi Shield will show a notification to the users. They will see the list of malwares and Quixxi Shield will quit the application
Tamper Protection
Report to Quixxi portal after threat detection
This option is set to ON by default and can be modified. If this option is ON, Quixxi Shield will report on Quixxi portal and in real-time the occurrence of the following threats, when the related shield option is selected: app not passing the integrity check, app attached to debugger, app running in a rooted device, app running in a device with malware[s] onboard, app running in a device allowing installation from unknown sources and app running in a device with active USB debugging
Validate app integrity
This option is set to ON by default and can’t be modified. If this option is ON, Quixxi Shield will insert the logic to verify the integrity of the app at runtime. If the check fails then the app will be immediately terminated. In the case of Cordova apps the integrity check is applied also on the “assets” folder
Terminate the app when running with the debugger attached
This option is set to OFF by default and can be modified. If this option is ON, Quixxi Shield will insert the logic to immediately terminate the app whenever a debugger is attached
Encrypt the “assets” folder
This option is set to OFF state by default and can be modified. It applies only to Cordova apps. If this option is ON, Quixxi Shield will automatically encrypt the files contained in the “assets” folder of the Android Studio project, inserting as well the logic to decrypt them at runtime
Terminate the app when “USB debugging” is enabled
This option is set to OFF state by default and can be modified. If this option is ON, Quixxi Shield will terminate the app whenever the “USB debugging” option is enabled on the device
Terminate the app if installation from “Unknown Sources” is enabled
This option is set to OFF state by default and can be modified. If this option is ON, Quixxi Shield will terminate the app when the installation from “Unknown Sources” option is enabled in the device settings. “Unknown Sources” is not anymore available on phones equipped with Android 8 due to the new Google security policies
Secure Communication
SSL certificate validation via SSL pinning
This option is set to OFF state by default and can be modified. This option applies ONLY to native apps. If this option is ON, Quixxi will hardcode the public key used by the mobile app [i.e. the client] to authenticate the server. In this way the app can ignore the device trust store and rely only on the assigned one[s]. The developer will enter the URLs making use of the public key to be verified. Quixxi will retrieve their public keys and include them within the logic needed to increase the security level of the app data in transit
Optimization and scope
Remove unused images
This option is set to ON state by default and can be modified. This option applies ONLY to native apps. If this option is ON, Quixxi Shield will search and remove the unused images in the “res” folder of the native app, thus reducing also its size
IMPORTANT – from a pure functional point of view signing the apk on Quixxi portal or locally makes no difference at all. But forgetting to sign it dramatically does. Google does NOT allow to install any unsigned app and any attempt to bypass this rule will result in a “Parse Error”
NOTE: if you need a protected and signed test app you will first need to access the “Edit android Provisioning Profile (Development)” window in the Apple portal, giving the permission to your testers. Then you will just need to provide the Development Certificate & Development Provision in the Quixxi boxes
Exclude packages/classes from Quixxi Shield action
This option is set to OFF state by default and can be modified. If this option is ON, the developer can enter the packages or classes to be excluded from Quixxi Shield action. Packages and classes must be separated by newlines and entered with their full names, e.g. com.quixxi.example1 for packages and com.quixxi.example6.MyNewClass for classes
App Signing
Sign your protected apk
This option is set to OFF by default and can be modified. If this option is ON, Quixxi Shield will first apply its security layer and then sign this secured IPA with your Certificate and Provision Profile. So the protected app that you will receive from the Download section of our portal is ready to be directly published on the App Store or directly installed in your provisioned devices. Of course you can also choose to benefit from Quixxi Shield effects without revealing us your certificates, signing the IPA on your own machine later
IMPORTANT – from a pure functional point of view signing the apk on Quixxi portal or locally makes no difference at all. But forgetting to sign it dramatically does. Google does NOT allow to install any unsigned app and any attempt to bypass this rule will result in a “Parse Error”
IMPORTANT – you can choose to sign the Android or iOS apps before launching the Shield directly via the portal while configuring its options or offline – locally on your machine – so that you are not forced to share your personal credentials with us. In the case of Android apps we don’t support the app signing by Google Play because this technique edits the original code and we protect against any external modifications by default
NOTE: if you need a protected and signed test app you will first need to access the “Edit android Provisioning Profile (Development)” window in the Apple portal, giving the permission to your testers. Then you will just need to provide the Development Certificate & Development Provision in the Quixxi boxes
Supervise configuration
Send events and device info to Quixxi portal [basic version]
This option is set to ON by default and can’t be modified. If this option is ON, Quixxi Shield will insert the logics to log basic events [new user and app start] plus other basic data like store used for the download, device vendor, model, operative system, app version, etc. In this case Quixxi will receive the data and automatically organize their display on the portal in pie charts and lists
Send crash reports to Quixxi portal
This option is set to OFF by default and can be modified. If this option is ON, Quixxi shield will insert the logics to detect the app crashes, filing each of them on Quixxi portal together with the debugging files needed to bugfix the issues. Moreover we will directly embed on our website a research on StackOverflow for each of the problems that were collected
Steps to manually sign an APK
Select “Shield” tab in the header bar, click on “Download” in the left menu, choose the Android icon in the top right corner and click on “Download the protected app” to download the unaligned, unsigned apk. You MUST sign it before it gets published on Google PlayStore and/or successfully executed on the phones. For this purpose you can use the following commands:
Steps to apply Quixxi App Shield to Android Archive (aar)
Please follow the steps below to protect your Android library with Quixxi App Shield:
- If you don’t have yet created the container for your aar file in Quixxi Portal please create one using the “Add New” button, otherwise go directly to point 3
- In the “Create your app” dialog give a name to your Android archive and click “Continue”
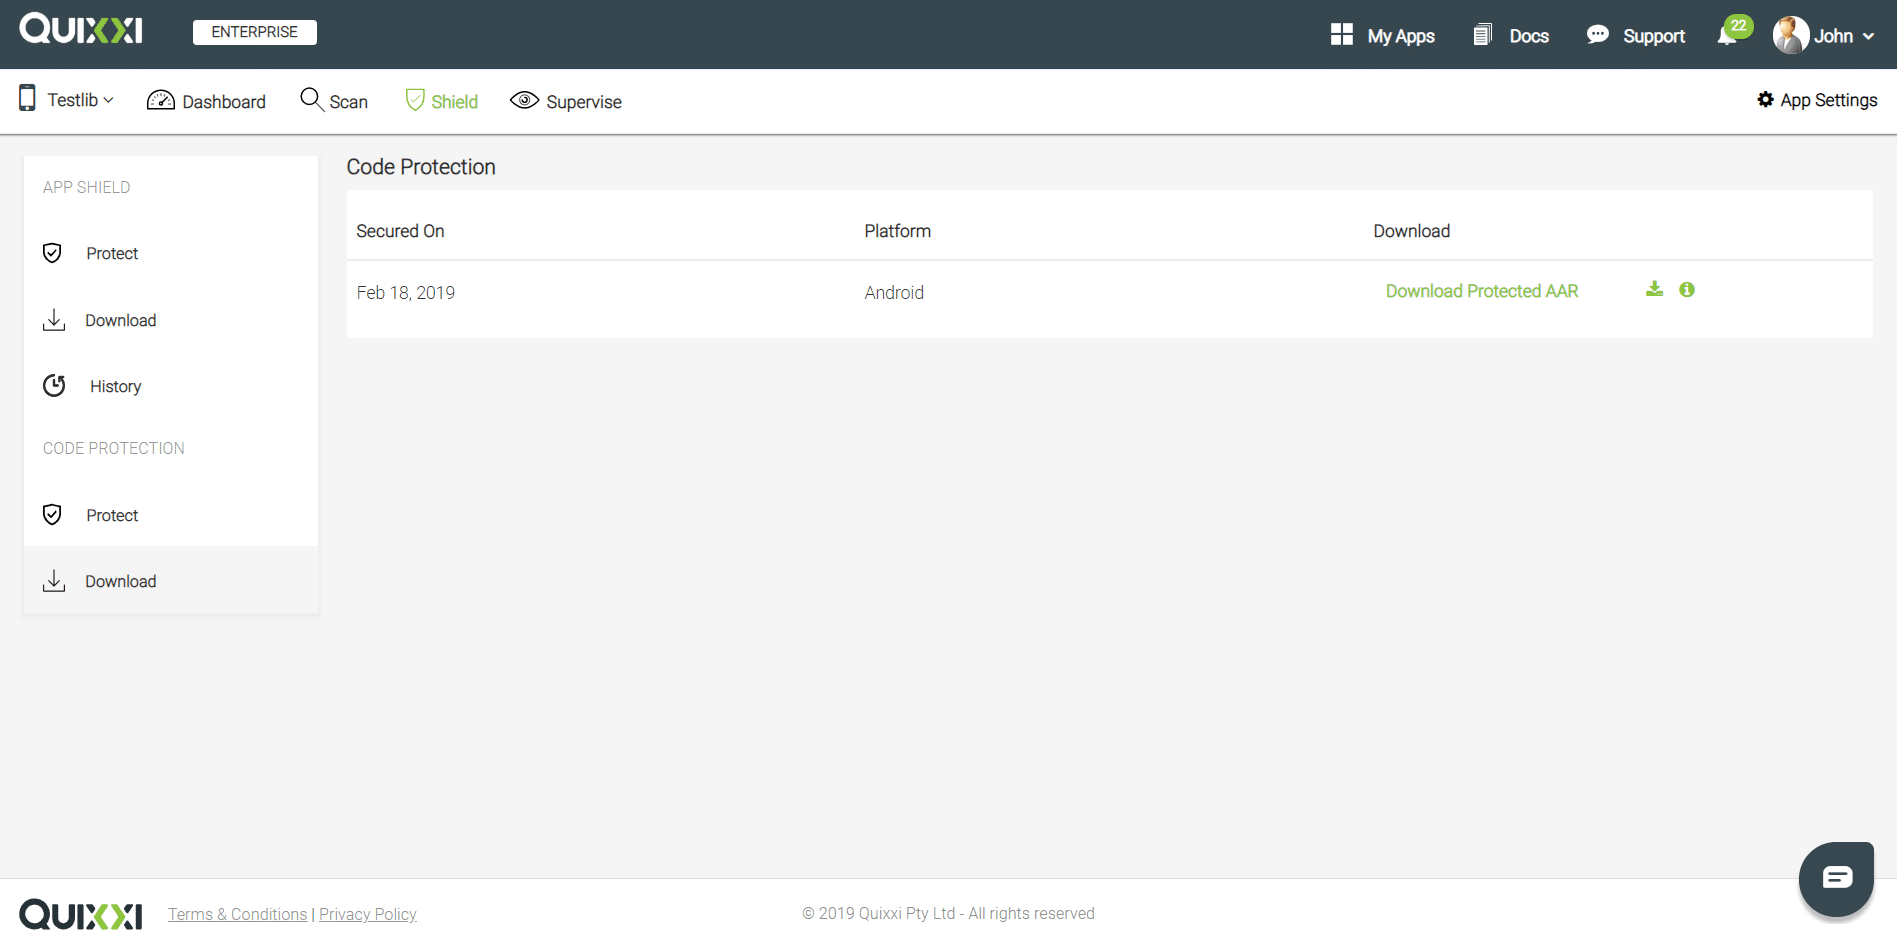
- Click the aar container and choose “Shield” in the header tab
- Click “Protect” in the “Code Protection” section of the left-side menu
- In the next window make sure to select “Android” and add the aar file to be processed either through drag’n’drop or browsing the filesystem
- At the end of the process your aar file has been secured and it’s ready to be integrated into another project, as described in the upcoming section. Click on the “Download Protected AAR” on the right side of the screen to download the protected library
Steps to integrate the secured aar file into an app
In order to solve the calls destined to the freshly secured library please import it as you would normally do:
- In Android Studio go to “File” -> “Project Structure…” -> click the “+” in the top left corner -> “Import .JAR/.AAR Package” -> “Next” -> select your secured library -> “Finish”. Please double-check that this step was correctly performed controlling that the “settings.gradle” file of your app shows a line like the following or add it to fix this step:
- After importing the secured SDK, click on “File” -> “Project Structure…” -> select “Dependencies” tab -> click the “+” in the top right corner -> “Module Dependency” -> select “:YourSecuredLibrary”. Again, please double-check that this step too was correctly performed opening your “build.gradle (Module: app)” file. You should already find [only] one of the following lines in the list of “dependencies”, else please add the one corresponding to your Gradle version:
Then you need to add to the launcher activity the QuixxiSecurity class that has been included in the protected aar file:
and insert this call:
Steps to apply Quixxi Security to Java Archive (jar)
Please follow the steps below to protect your Java archive with Quixxi Security:
- If you don’t have yet created the container for your jar file in the Quixxi portal please create one using the “Add New” button, otherwise go directly to point 3
- In “Create your app” dialog give a name of your application and click Continue
- Click the newly created app and choose “Shield” in the header tab
- Click “Protect” in the “Code Protection” section of the left-side menu
- In the next window make sure Android Radio button is selected and select the jar to be uploaded
- Once Quixxi App Shield is applied to the jar file click on the “Download Protected JAR” on the right side of the screen to download the protected library
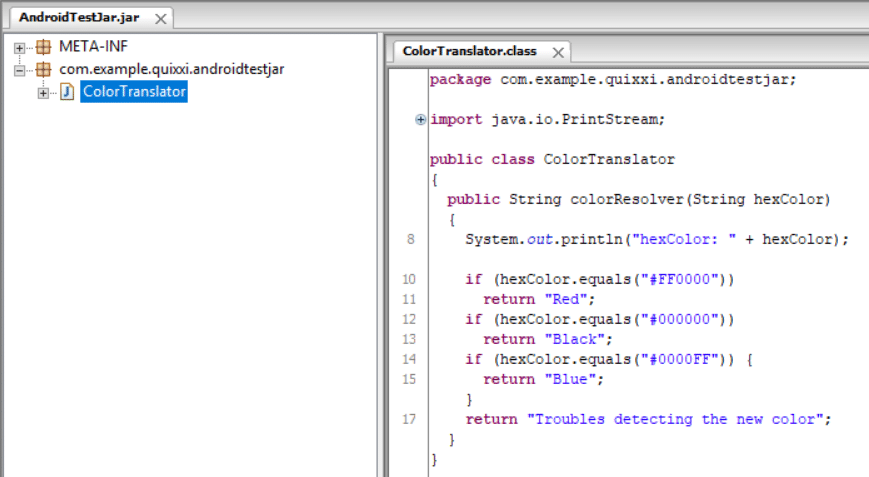
Your original jar file has been secured as a combination of a .java file plus the shared object [.so] files needed for targeting different processors architectures. The next two screenshots show the decompilation of the jar file and the corresponding java file obtained after Quixxi protection
We are now ready to start the integration in an Android app
Steps to integrate the secured jar file into an app
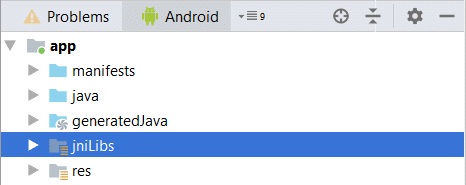
NOTE – despite the presence of the “jniLibs” folder the Android NDK [Native Development Kit] installation is NOT required to be able to compile and run the app with the protected library. We will leverage the JNI [Java Native Interface]
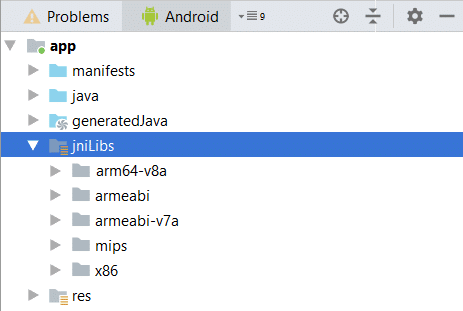
- Unpack your downloaded protected library. You will find two zip files to unpack: “jniLibs.zip” and “src.zip”
- If in Android Studio you still don’t have a “jniLibs” folder create it right-clicking on the “app” folder in your Android view -> “New” -> “Folder” -> “JNI Folder”, otherwise you are already good to go
- Copy the 5 folders [and their content] got from “jniLibs.zip” -> select the “Android” view of Android Studio -> right- click the “jniLibs” folder of your Android project -> “Paste”
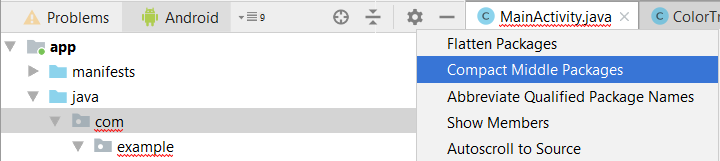
- Inside the “src.zip” file you will find a folder structure that must be exactly replicated in the Android view of the project. In order to achieve this you need to expand the dropdown menu coming from the gear icon -> unflag “Compact Middle Packages”. Then from the file explorer copy from the “src” folder the directories to be added to Android Studio. Go back to this IDE -> right-click on one of the packages and select “Paste” to nest the copied folders OR “New” -> “Package” to create a brand new package
For the sake of simplicity we will show in the next screenshot the correspondence between the folder structure of the “src” folder got from the downloaded “src.zip” file and the corresponding package structure replicated in Android Studio. Of course every folder/package is inclusive of the files provided by “src.zip”, even if they are not explicitly shown. Please pay attention to the different nested levels

Example
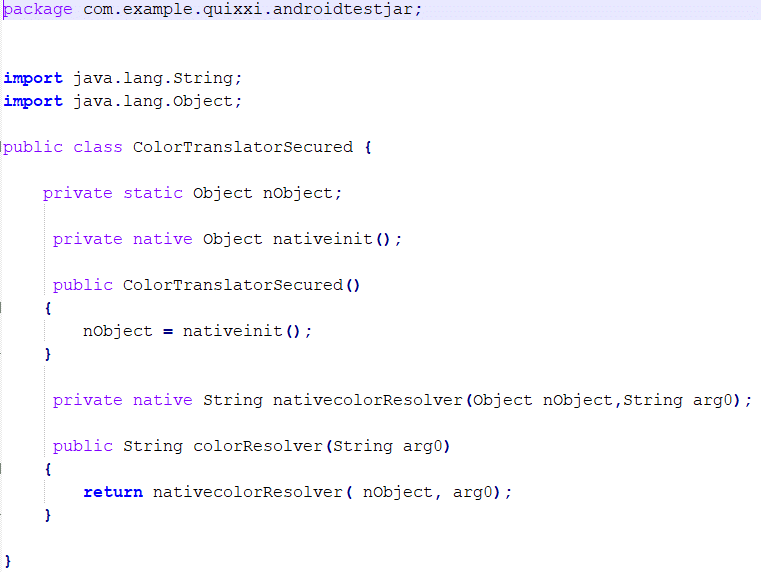
We had an original unprotected “ColorTranslator.jar” library with package name equal to “com.example.quixxi.androidtestjar”, transformed by Quixxi App Shield into a “ColorTranslatorSecured.java” file plus the content in the “com/quixxi” path
We wanted to integrate this protected library into an app with a package name equal to “com.example.quixxi.androidtestapp”. So – given our starting “src” folder structure – we copied & pasted the “androidtestjar” directory in the already existent “com.example.quixxi” path and the “quixxi” directory inside the already existent “com” package
- In the last folder of the path corresponding to the library package name there is a Java file with the format “originalJarLibraryNameSecured.java”. It simply represents the Java interface calling the native layer where your code has been moved. Let’s import it into the Android activity where the library is used:
In our previous example the original unprotected “ColorTranslator.jar” with package name “com.example.quixxi.androidtestjar” was transformed into native code accessible only through the Java interface provided by the “ColorTranslatorSecured” class. So in the “MainActivity” of our sample where we instantiated this class we imported it as follows:
- The security feature realized by Quixxi must be enabled importing the Security class:
and then adding these lines in the “onCreate()” method of the activity making use of the library:
NOTE: if you use ALT+ENTER to solve the preceding import please be sure to add the security class given by “com.quixxi.security” package, NOT the one coming from the “java.security” package
- If you had previously integrated the unprotected library please correct all the instances mentioning the old unprotected classes adding the “Secured” suffix, e.g.
becomes:
VERY IMPORTANT: do NOT call the Java constructor for the classes in the secured libraries before calling the security initialization API provided by Quixxi
According to what has been just said, with such a snippet:
you would get an error like:
In fact, the constructor for the “ColorTranslatorSecured” class has been moved into the native layer, so it will not be resolved until the “Security” class provided by Quixxi gets initialized. In particular, the “Security” class contains the “System.loadLibrary()” call needed to load the native library where the constructor has been moved
Thus the code for the previous snippet will be fixed as follows:
At this point the entire app should compile, despite the native methods [indicated by the “native” keyword] declared in the “originalJarLibraryNameSecured.java” file will still be written in red and complaining
Utility APIs for securing runtime data in jar files
In addition to the features already presented Quixxi Shield provides for jar files the Utility APIs. In fact, all the features provided by the Quixxi App Shield and seen so far are useful to secure your code against its decompilation [then for a “static security”] but you may require to secure also runtime user data – like usernames and passwords – and/or files created by Android OS at runtime, as the Shared Preferences
Please have a look at our API Reference for more detailed information about our SDK
Encryption Utilities APIs to secure runtime data in jar files
Quixxi App Shield provides APIs to encrypt confidential information and decrypt it when required. You could use the AES algorithm or base 64 encoding/decoding mechanism for your encryption and decryption scenarios
In order to use them inside a jar file please have a look at this snippet:
Usage of Shared Preferences API in jar files
As reported in the official Android documentation, if you have a relatively small collection of key-values that you would like to save you should use the Android Shared Preferences APIs. But you may wish to have a secured place inside the device where to store them safely until you need to retrieve them
In fact, if for example the phone of your final user is rooted it will be possible to retrieve them just taking the xml file stored in the filesystem under the “/data/data//shared_prefs/” directory
So this functionality is achieved by using Quixxi SharedPreferences API into your jar file:
NOTE: the import in the snippet above will be automatically solved by the protected jar
Android Security SDK – Quick Start Guide
Introduction
Quixxi Security is usable for enterprises, mobile app developers to secure their mobile apps from piracy, revenue loss, IP theft, loss of user data , hacking and cracking. Quixxi Security ensures your application is fully protected with our multi layered encryption engine that prevents your application from being reverse engineered and tampered with.
Salient features
-
-
- Security Framework will encrypt your business logic code of your application and move it to native low layer
- Framework uses java reflection to hide the method calls and it removes the method body and replaces it with native method calls to protect the apps business logic from crackers
- Prevents revenue loss caused by cracked usage of application
Easy to Integrate your existing applications - Provides additional APIs for encrypting the App data and shared preferences API for storing data secretly in device
-
Note
If you use ProGuard, Make sure that the below line of code is added to the Proguard.
Steps to apply Quixxi Security to Android app
Please follow the steps below to protect your Android application with Quixxi Security
-
-
- Create a new app in Quixxi Portal using “Add New” button.
- In “Create your app” dialog give a name of your application and click Continue
- Click the newly created app and choose “Security” in the header tab.
- Under the Android Section Click “Protect now” to protect your app.

- In the next window make sure Android Radio button is selected and select the apk to be uploaded
- Scroll down the window and the choose the appropriate plan and then click Next select the options in securing the apk
- Select the the options which you want to be added to your protected apk and click ‘Next’.
- Once you Click Next the apk will be uploaded to server and Quixxi security will be applied.
- Once Quixxi Security is applied to the apk, you will be automatically redirected to the Report page. Click on the Download Protected App on the top right corner under the header to download the protected app
After applying security quixxi provides unaligned, unsigned apk. You need to sign apk before publishing it to play store.
Use following commands to sign your apk
-
Steps to apply Quixxi Security to Android Archive (aar)
Please follow the steps below to protect your Android library with Quixxi Security
-
-
- Create a new app in Quixxi Portal using “Add New” button.
- In “Create your app” dialog give a name of your application and click Continue
- Click the newly created app and choose “Security” in the header tab.
- Scroll down to the bottom of the page and click the “Protect” button Under the Code Protection in the left side of the window.
- In the next window make sure Android Radio button is selected and select the aar to be uploaded.
- Scroll down the window and the choose the appropriate plan and then click Next to start uploading the aar .
- Once Quixxi Security is applied to the aar,Click on the Download Protected aar on the top right corner under the header to download the protected app.
- To initialize quixxi security framework add the following line to the launcher activity
- Now your application is secured and ready for market release
-
Steps to apply Quixxi Security to Java Archive (jar)
Please follow the steps below to protect your Android library with Quixxi Security
-
-
- Create a new app in Quixxi Portal using “Add New” button.
- In “Create your app” dialog give a name of your application and click Continue
- Click the newly created app and choose “Security” in the header tab.
- Scroll down to the bottom of the page and click the “Protect” button Under the Code Protection in the left side of the window.
- In the next window make sure Android Radio button is selected and select the aar to be uploaded.
- Scroll down the window and choose the appropriate plan and then click Next to start uploading the jar.
- Once Quixxi Security is applied to the jar, Click on the Download Protected jar on the top right corner under the header to download the protected app.
- Copy the native library (.so) to your libs directory
- Replace your application source packages (packaged as jar which was meant to be secured) with the secured source packages generated from Quixxi Security
- Once the libs and packages are integrated, you need to add the lines of code specified below to your main application class
- Now your application is secured and ready for market release
-
Usage of Utility API in Java Archive (jar)
In addition to features, Quixxi security provides utility APIs for usage in application development.
You can also check out our API Reference for more detailed information about our SDK.
Steps to Encrypt and Decrypt in Java Archive (jar)
Quixxi Security provides APIs to encrypt confidential information and use the encrypted data and decrypt the encrypted text to get back the original data when required. You could use the AES algorithm or base 64 encoding/decoding mechanism for your encryption and decryption scenarios.
A snippet of usage of encryption and decryption as
Usage of Shared Preferences API in Java Archive (jar)
You may wish to have a secured place inside the device, so that you can save the data you want and retrieve it later when necessary. This functionality is achieved by using our Shared Preferences APIs. The shared preferences in the devices is like a secret location which cannot be seen or tracked by casual looking or searching. So, the APIs use this place for storing any secret data which is required at some time or the other.