Android Licensing SDK – Quick Start Guide
Summary
Quixxi Licensing SDK is usable by enterprises and mobile app developers to protect the distribution of paid apps on Google Play Store, Samsung Galaxy Apps and Amazon Appstore. You can track and block the usage of your paid app whenever it is not the one provided by these recognized storesSalient Features
Quixxi Licensing framework:- is highly secure. The framework uses many salt libraries to prevent application from crackers and also to confuse them. All the methods used for license validation are encrypted
- automatically identifies upon app launch whether the user has a valid license bought from Google Play Store
- automatically identifies if the paid app has been downloaded and installed from other unofficial but recognized stores as Samsung Galaxy Apps
- displays to illegal users error messages preventing the app usage, embedding them into the app as native code [C code] and making them quite inescapable
- implements a customer conversion policy, prompting to illegal users a dialog to purchase the app, in order to keep the client and increase your revenue
- offers multi-level security to your apps through the integration of our Licensing APIs
Google Firebase setup
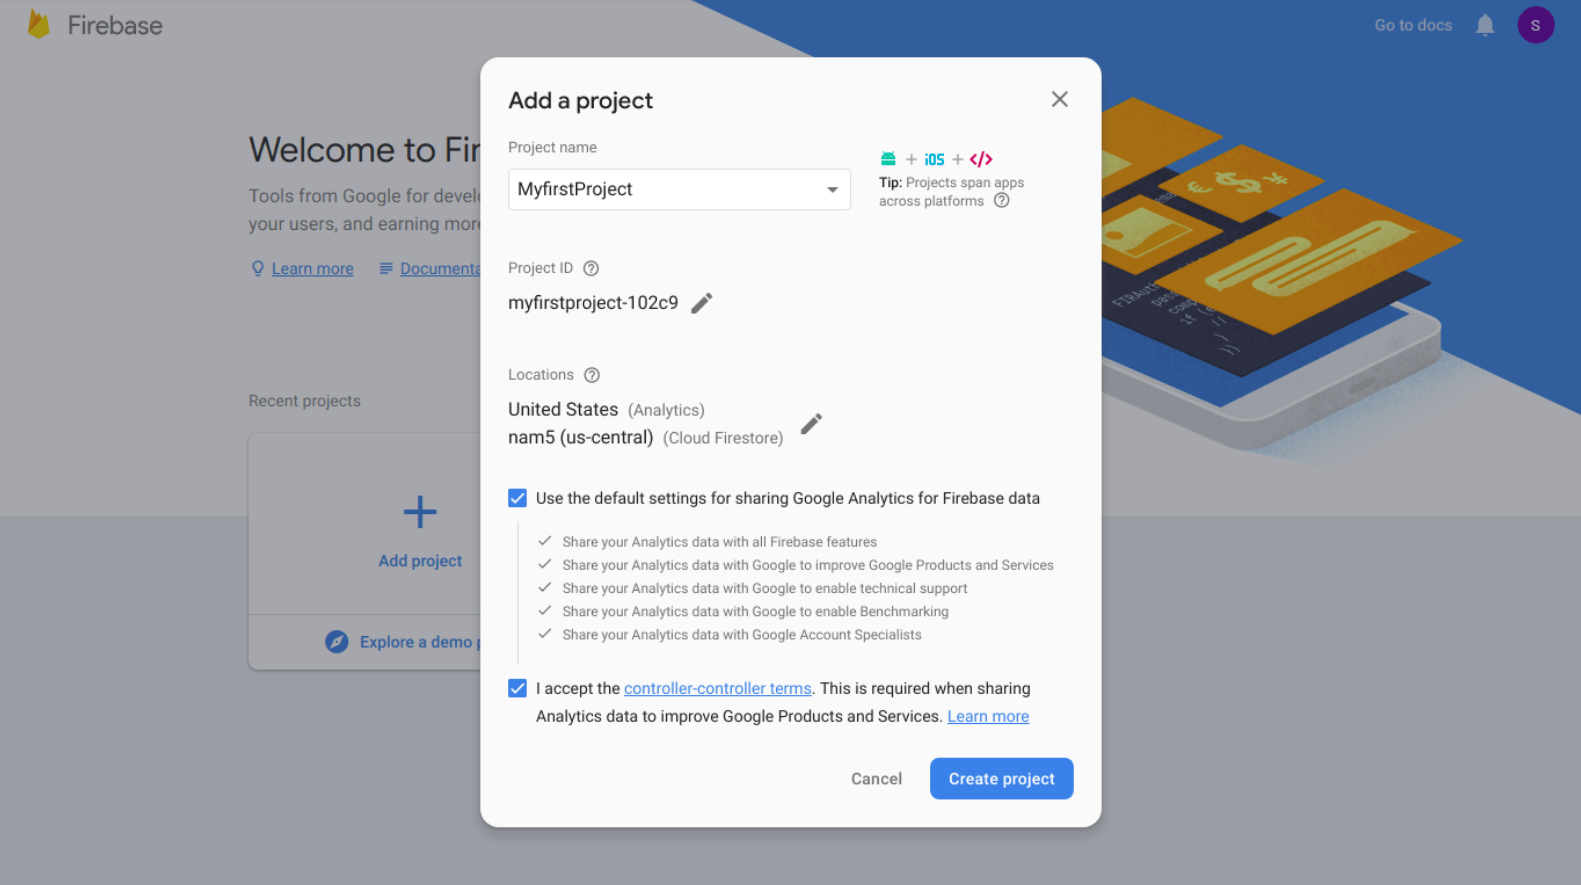
Our first target will be Google Firebase integration. The reason is that it will generate the Server Key needed for producing the Quixxi Licensing SDK to be integrated in your paid app. In order to proceed please:- create a project in Firebase console following the procedure explained in the Android documentation
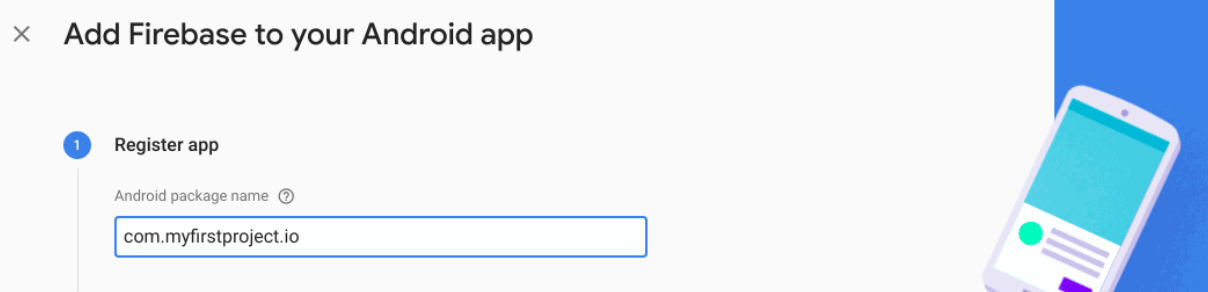
- register the app in Google Firebase
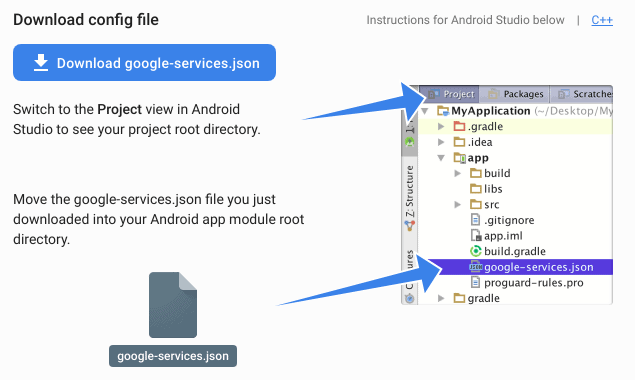
- copy the “google-services.json” file into the project’s app module folder [typically “projectfolder/app/”], as described by Google
- select “build.gradle (Project)” and in the dependencies section please add: Please always use the latest version the “google-services” dependency
- add the FCM dependencies to your “build.gradle (Module: app)” file, e.g.: Please always use the latest versions of these dependencies
- at the end of the same file – out of the dependencies – please add:
- at this point – before proceeding further – please run the app to check that everything is all right
Creating the Licensing SDK on Quixxi Portal
Now – with Firebase correctly configured – we can start compiling and integrating Quixxi Licensing SDK as follows:- if you don’t have yet created the container for your app in Quixxi portal create one using the “Add New”button, otherwise go directly to point 3
- in the “Create your app”dialog give a name to your app and click “Continue”
- click on the app box related to your app, choose “Supervise”in the header tab and then “Package” in the left-side menu
- click “Add Platform”and choose Android as platform. Analytics framework in the “Select modules” section should already come preselected
- enter the package name used in Android Studio, the FCM Server Key, the Google License Key and click “Start Packaging”
- now Quixxi will produce a library containing both Analytics and Licensing Frameworks, notifying you once it gets completed
- click “Download Library” to get the library and you will receive a package which contains a module called “QuixxiLibrary.aar”
Steps to integrate Quixxi Licensing SDK into an Android app
After downloading the Licensing SDK for the app let’s see how to integrate it into the Android Studio project and have License verification and Illegal Users management- in Android Studio go to ”File” -> ”Project Structure…” -> click the ”+” in the top left corner -> “Import .JAR/.AAR Package” -> “Next” -> select “QuixxiLibrary.aar” -> “Finish”. Please double-check that this step was correctly performed controlling that the “settings.gradle” file of your app shows a line like the following or add it to fix this step:
- after importing the Quixxi Licensing SDK, click on “File” -> “Project Structure…” -> select “Dependencies” tab-> click the “+” in the top right corner -> “Module Dependency” -> select “:QuixxiLibrary”. Again, please double-check that this step too was correctly performed opening your ”build.gradle (Module: app)” file. You should already find the following line in the list of “dependencies”, else please add it:
Initialising the Quixxi Licensing framework
- in order to enable the Licensing framework you first need to import the class for Licensing: and then add the following lines of code in the onCreate(), onResume() and onPause() methods of your MainActivity
- in the onCreate() method please add:
- in the onResume() method please add:
- in the onPause() method please add:
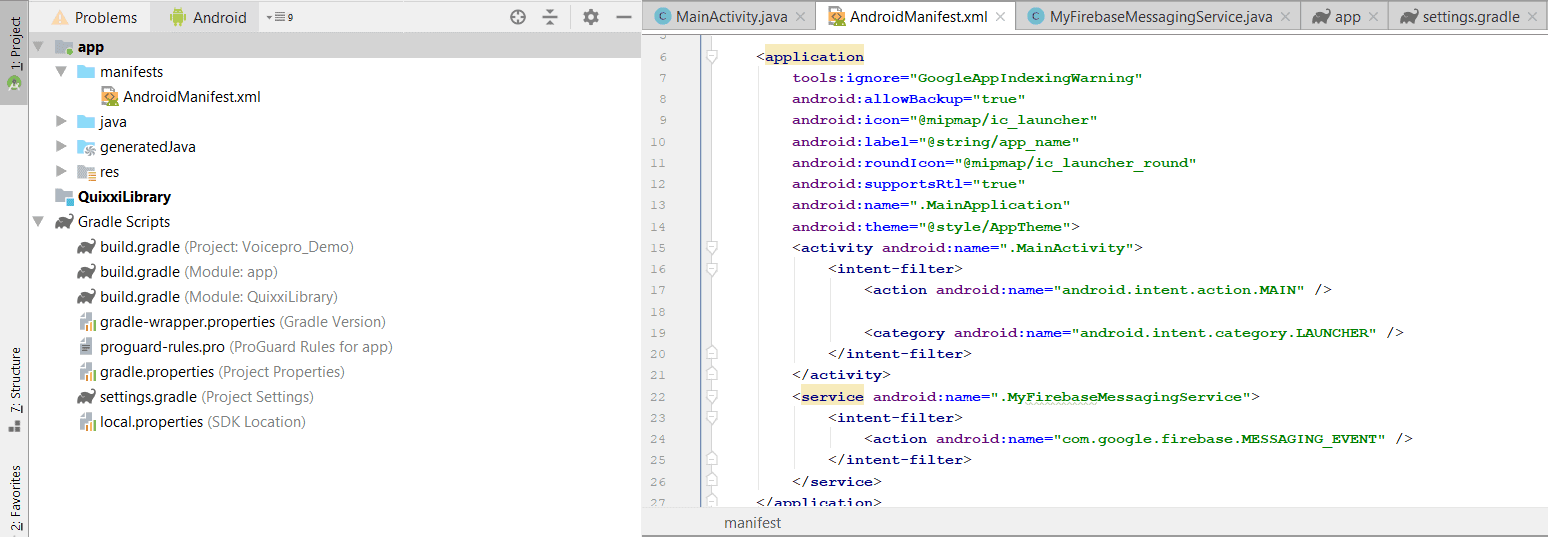
- after this let’s move to the “AndroidManifest.xml” file of your app to declare the messaging service. Further details can be found here
Your manifest now will look similar to:
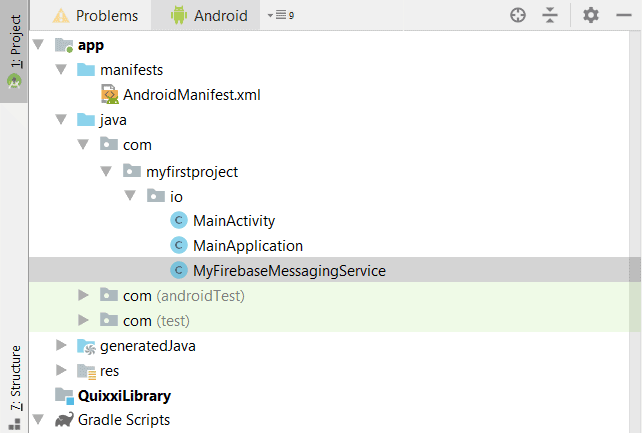
- create a new class “MyFirebaseMessagingService” on the same level of your MainActivity copying and pasting the following code:
- finally let’s manually add the Firebase dependencies into your ”build.gradle (Module: app)” file, e.g.:
View users information in Quixxi Dashboard
Once your app has integrated both the Analytics and Licensing frameworks and is published on the PlayStore you can view the breakdown about the users of your apps on the Quixxi portal. You will find the statistics about the number of licensed users, unlicensed users and the number of users that you have blocked for the illegal installation of your appHow to block a user and blocking policies
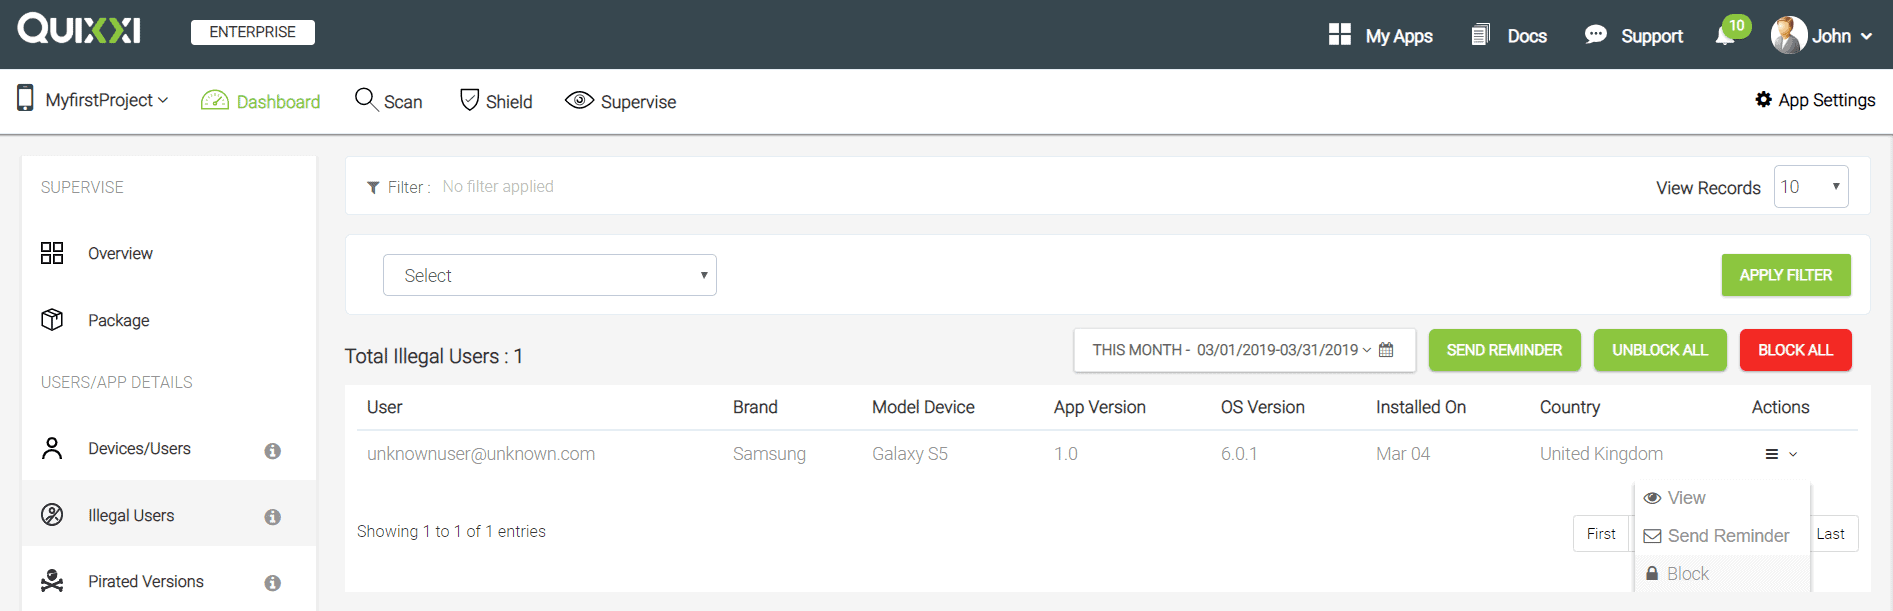
You can prevent any user – legal or illegal – from using the app entering the Quixxi portal under “Supervise” -> “Users” [“Data” view in the top right corner] or “Illegal Users” -> “Block” from the dropdown menu at the end of the line. A message for blocking will be sent to the app and – after showing a block dialog – its further use is disabled
A user can be blocked according to three different policies that are shown and explained below:
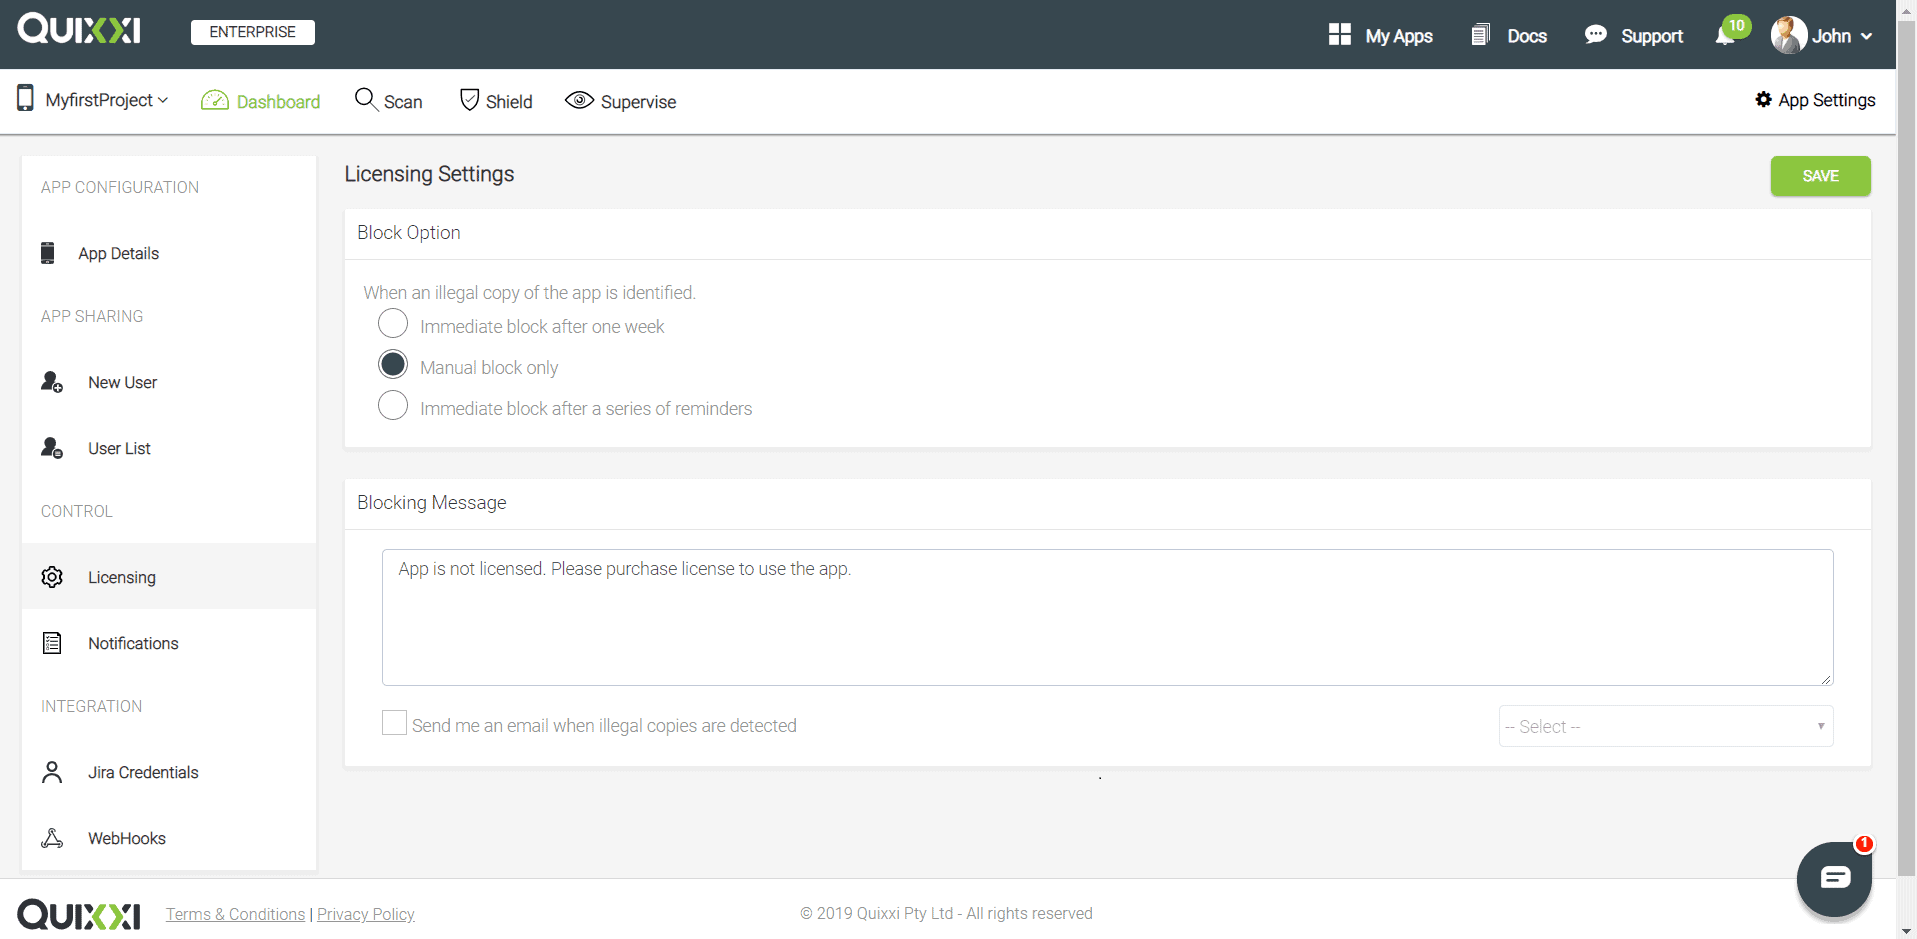
- “Immediately block after 7-day grace period” – with this blocking policy the user is given by default a grace period of one week which is the maximum time for the illegal user to become a regular user. In this timeframe the illegal user will be treated like a legal one. Such period might not necessarily be a courtesy but a good practice. If the transaction to buy the app takes time to be approved then a user who already paid could be seen as illegal only because the payment has not been processed. Thus – due to his temporary illegal status – he could not be able to use the app despite having paid for. In this scenario a grace period can help avoid bad reviews and complaints on PlayStore. Anyway after the grace period expiration the user will be immediately blocked
- “Manual block only” – it is the option where the developer is in charge of choosing what to do, without any grace period involved
- “Send a series of reminders before blocking (suggested)” – with this strategy you can reduce the grace period duration, schedule the messages to be sent to the illegal users and automatically block them straight after if they don’t buy the app
Push Notifications
The same dropdown menu has a “Message” feature that you can use to send push notifications to warn specific illegal customers about the License infringement or to all your userbase, for example to keep them updated [e.g. send a notification for a new promotion or a new functionality]Android Licensing SDK – Quick Start Guide
Summary
Quixxi Licensing SDK is usable by enterprises and mobile app developers to protect the distribution of paid apps on Google Play Store, Samsung Galaxy Apps and Amazon Appstore. You can track and block the usage of your paid app whenever it is not the one provided by these recognized storesSalient Features
Quixxi Licensing framework:- is highly secure. The framework uses many salt libraries to prevent application from crackers and also to confuse them. All the methods used for license validation are encrypted
- automatically identifies upon app launch whether the user has a valid license bought from Google Play Store
- automatically identifies if the paid app has been downloaded and installed from other unofficial but recognized stores as Samsung Galaxy Apps
- displays to illegal users error messages preventing the app usage, embedding them into the app as native code [C code] and making them quite inescapable
- implements a customer conversion policy, prompting to illegal users a dialog to purchase the app, in order to keep the client and increase your revenue
- offers multi-level security to your apps through the integration of our Licensing APIs
Google Firebase setup
Our first target will be Google Firebase integration. The reason is that it will generate the Server Key needed for producing the Quixxi Licensing SDK to be integrated in your paid app. In order to proceed please:- create a project in Firebase console following the procedure explained in the Android documentation
- register the app in Google Firebase
- copy the “google-services.json” file into the project’s app module folder [typically “projectfolder/app/”], as described by Google
- select “build.gradle (Project)” and in the dependencies section please add: Please always use the latest version the “google-services” dependency
- add the FCM dependencies to your “build.gradle (Module: app)” file, e.g.: Please always use the latest versions of these dependencies
- at the end of the same file – out of the dependencies – please add:
- at this point – before proceeding further – please run the app to check that everything is all right
Creating the Licensing SDK on Quixxi Portal
Now – with Firebase correctly configured – we can start compiling and integrating Quixxi Licensing SDK as follows:- if you don’t have yet created the container for your app in Quixxi portal create one using the “Add New”button, otherwise go directly to point 3
- in the “Create your app”dialog give a name to your app and click “Continue”
- click on the app box related to your app, choose “Supervise”in the header tab and then “Package” in the left-side menu
- click “Add Platform”and choose Android as platform. Analytics framework in the “Select modules” section should already come preselected
- enter the package name used in Android Studio, the FCM Server Key, the Google License Key and click “Start Packaging”
- now Quixxi will produce a library containing both Analytics and Licensing Frameworks, notifying you once it gets completed
- click “Download Library” to get the library and you will receive a package which contains a module called “QuixxiLibrary.aar”
Steps to integrate Quixxi Licensing SDK into an Android app
After downloading the Licensing SDK for the app let’s see how to integrate it into the Android Studio project and have License verification and Illegal Users management- in Android Studio go to ”File” -> ”Project Structure…” -> click the ”+” in the top left corner -> “Import .JAR/.AAR Package” -> “Next” -> select “QuixxiLibrary.aar” -> “Finish”. Please double-check that this step was correctly performed controlling that the “settings.gradle” file of your app shows a line like the following or add it to fix this step:
- after importing the Quixxi Licensing SDK, click on “File” -> “Project Structure…” -> select “Dependencies” tab-> click the “+” in the top right corner -> “Module Dependency” -> select “:QuixxiLibrary”. Again, please double-check that this step too was correctly performed opening your ”build.gradle (Module: app)” file. You should already find the following line in the list of “dependencies”, else please add it:
Initialising the Quixxi Licensing framework
- in order to enable the Licensing framework you first need to import the class for Licensing: and then add the following lines of code in the onCreate(), onResume() and onPause() methods of your MainActivity
- in the onCreate() method please add:
- in the onResume() method please add:
- in the onPause() method please add:
- after this let’s move to the “AndroidManifest.xml” file of your app to declare the messaging service. Further details can be found here
Your manifest now will look similar to:
- create a new class “MyFirebaseMessagingService” on the same level of your MainActivity copying and pasting the following code:
- finally let’s manually add the Firebase dependencies into your ”build.gradle (Module: app)” file, e.g.:
View users information in Quixxi Dashboard
Once your app has integrated both the Analytics and Licensing frameworks and is published on the PlayStore you can view the breakdown about the users of your apps on the Quixxi portal. You will find the statistics about the number of licensed users, unlicensed users and the number of users that you have blocked for the illegal installation of your appHow to block a user and blocking policies
You can prevent any user – legal or illegal – from using the app entering the Quixxi portal under “Supervise” -> “Users” [“Data” view in the top right corner] or “Illegal Users” -> “Block” from the dropdown menu at the end of the line. A message for blocking will be sent to the app and – after showing a block dialog – its further use is disabled
A user can be blocked according to three different policies that are shown and explained below:
- “Immediately block after 7-day grace period” – with this blocking policy the user is given by default a grace period of one week which is the maximum time for the illegal user to become a regular user. In this timeframe the illegal user will be treated like a legal one. Such period might not necessarily be a courtesy but a good practice. If the transaction to buy the app takes time to be approved then a user who already paid could be seen as illegal only because the payment has not been processed. Thus – due to his temporary illegal status – he could not be able to use the app despite having paid for. In this scenario a grace period can help avoid bad reviews and complaints on PlayStore. Anyway after the grace period expiration the user will be immediately blocked
- “Manual block only” – it is the option where the developer is in charge of choosing what to do, without any grace period involved
- “Send a series of reminders before blocking (suggested)” – with this strategy you can reduce the grace period duration, schedule the messages to be sent to the illegal users and automatically block them straight after if they don’t buy the app