ANDROID ANALYTICS SDK – Quick Start Guide
Summary
This document describes how to integrate the Quixxi Analytics SDK into an Android application. The implementation of Quixxi Analytics will allow you to have custom Events and Diagnostics. Please check out our API Reference for more detailed information about this SDK.Creating the Analytics SDK on Quixxi Portal
- If you don’t have yet created the container for your app in Quixxi Portal create one using the “Add New” button, otherwise go directly to point 3.
- In the “Create your app” dialog give a name to your application and click “Continue”
- Click on the newly created app,choose “Control” in the header tab and then “Package” in left side menu.
- Click “Add Platform” and choose Android as platform. Analytics framework in the “Select modules” section should already come preselected.
- Give the same package name you used for this app in Android Studio and click “Start Packaging”.
- Now Quixxi will pack Analytics framework and notify you once it gets completed.
- Click “Download Library” to get the file to integrate in your project. Details for this point will be fully covered in the next section. The package received contains two files: a “Readme.txt” file containing the instructions and the AppGUID and the “QuixxiLibrary.aar”.
Steps to integrate Quixxi Analytics SDK into an Android app
After downloading the Analytics SDK for the app let’s see how to integrate it into the Android Studio project and have custom Events and Diagnostics as in the sample app- In Android Studio go to “File” -> “Project Structure…” -> click the “+” in the top left corner -> “Import .JAR/.AAR Package” -> “Next” -> select “QuixxiLibrary.aar” -> “Finish”. Please double-check that this step was correctly performed controlling that the “settings.gradle” file of your app shows a line like the following or add it to fix this step:
- After importing the QuixxiAnalytics SDK, click on “File” -> “Project Structure…” -> select “Dependencies” tab-> click the “+” in the top right corner -> “Module Dependency” -> select “:QuixxiLibrary”. Again, please double-check that this step too was correctly performed opening your ”build.gradle (Module: app)” file. You should already find [only] one of the following lines in the list of “dependencies”, else please add the one corresponding to your Gradle version:
- These are the permissions to be requested in your Android Manifest:
Initialising the Quixxi Analytics SDK
First of all add the following import to your project: Now let’s focus on the “onCreate()” method of your launcher activity. Debug Logs from Quixxi Analytics SDK can be optionally activated inserting the following line: Quixxi is able to derive the user’s country-wise position automatically from the network provider and locale settings but you can overwrite Quixxi detection retrieving latitude and longitude coordinates on your own and then calling: The location data provided with the preceding API will be again resolved country-wise and displayed on the map in Quixxi portal. To access it click on your app container -> “Supervise” -> “Devices/Users” -> select “Chart” view in the top right corner and scroll down till the end of the page. The users map is refreshed at most once per day, when the user starts the app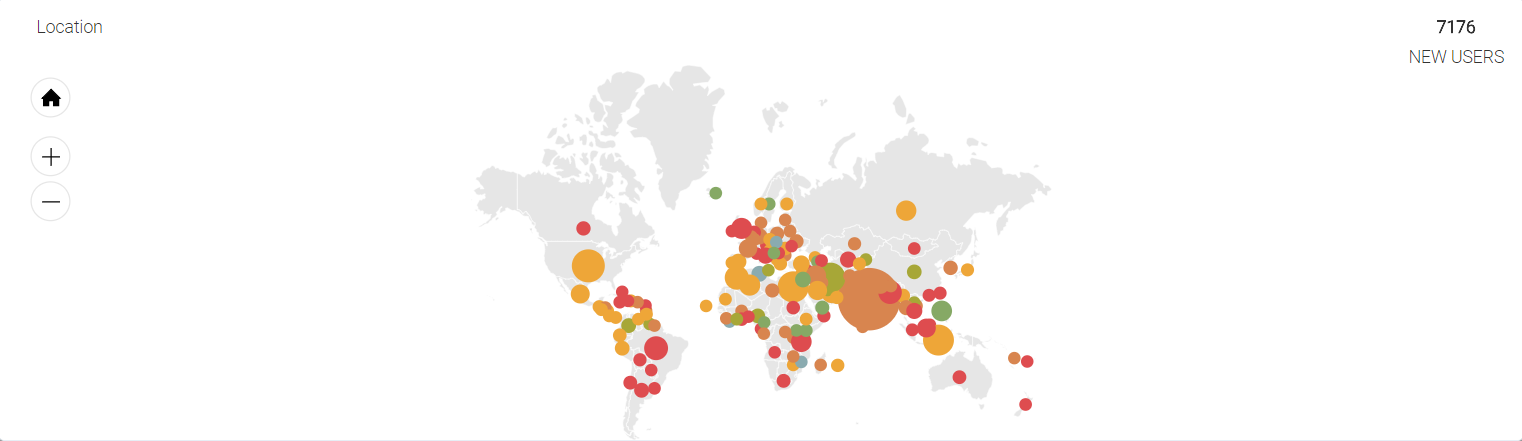
Collecting or updating the user email
Quixxi’s basic functionality in the past was able to automatically retrieve the user’s email address via the GET_ACCOUNTS permission. But – starting from Android 6.0 [SDK version: 23] – it became classified among the dangerous permissions. For this reason we started deprecating this permission request of ours, leaving completely to the developer the choice of asking it or notThus, in order to have the real user email displayed on our portal there are two ways: – integrate Google Sign-In into your app as described here and then send the email to our portal via the QuixxiAnalytics.sendUserEmail() API – ask the customer to grant you the GET_ACCOUNTS permission at runtime [especially if it is really functional for your app purposes], implement your own getGoogleEmail() method and then call the previous API to send the user email on our portal. If you decide to follow this path please have a look at Appendix A at the end of this document for a sample snippet showing how to ask the GET_ACCOUNTS permission for Android 6.0 and later versions
As you see can see – independently from the approach you will adopt – once you have the email associated to your customer you can update the corresponding user profile calling the following API: Once you have the email you can update the user profile calling the following API: The users emails will be available under “Supervise” -> “Users/Devices”, as shown in the following screenshot:

Sending events
Once the Quixxi Analytics library is fully initialized you can push events to the Quixxi portal with one of the following methods: where:Example
Sending crash reports
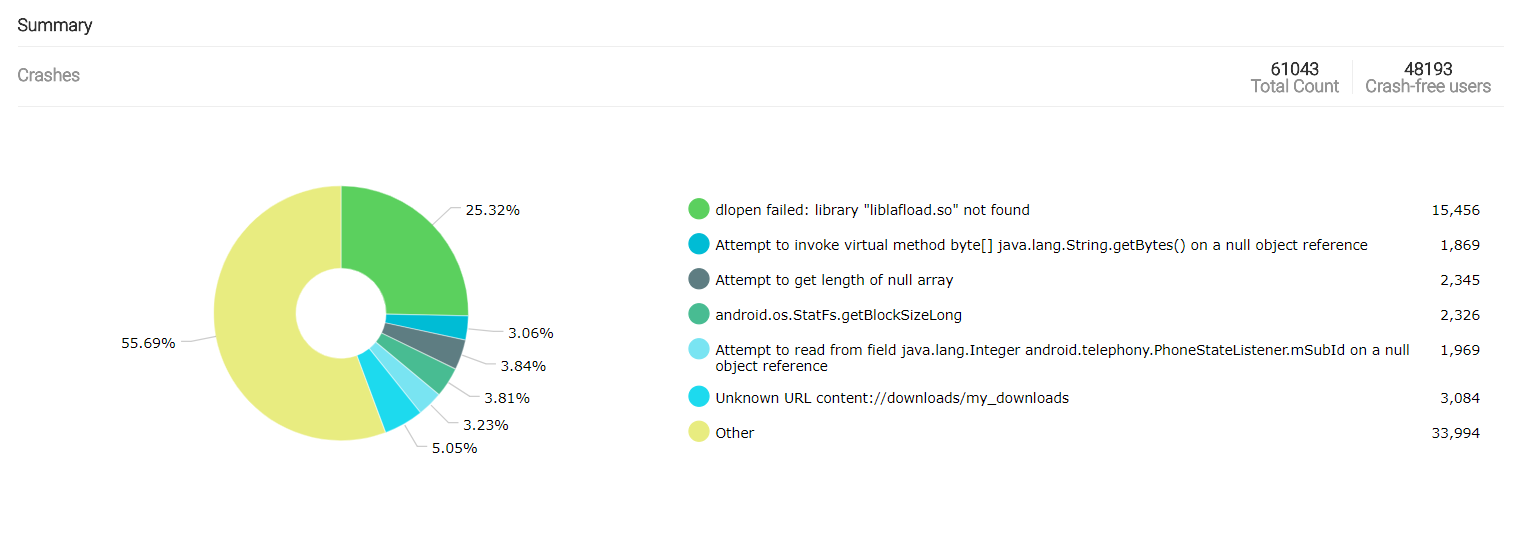
Quixxi Analytics SDK integration will automatically file on the portal all the uncaught exceptions happening in your application. This will happen without adding any API to your code. Moreover you will be able to access the debugging files that will help you troubleshooting the issue – e.g. Stack Trace, Logcat, etc. – exactly as you would be able to do with the real device experiencing that problem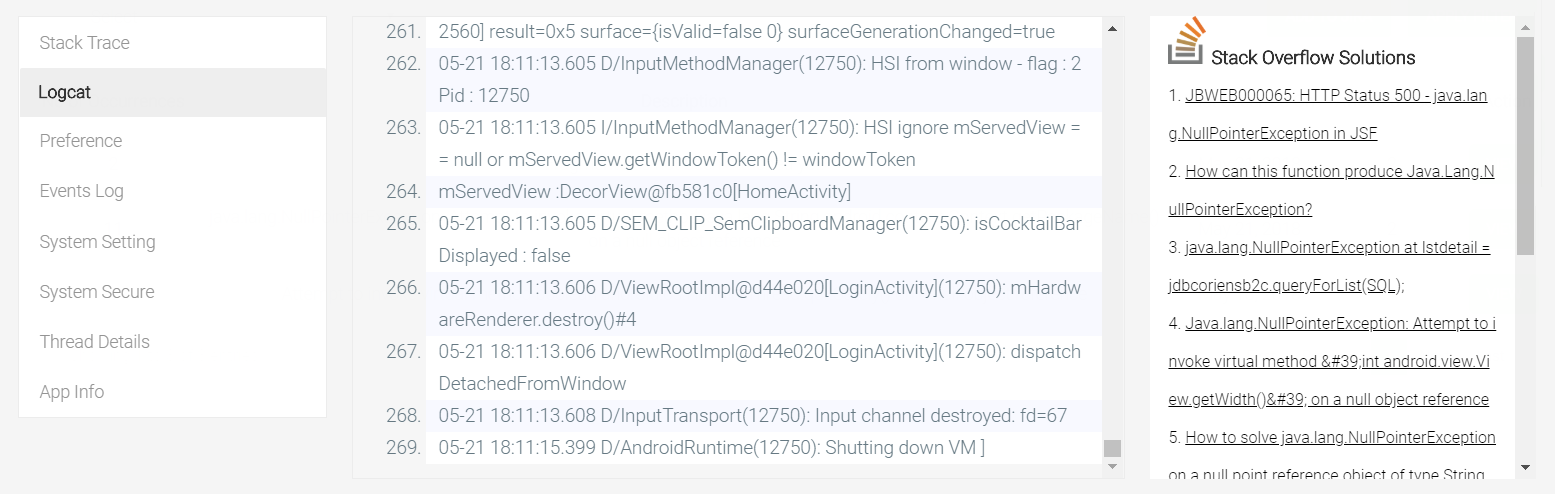
Sending and checking Shared Preferences
You can push the shared preferences stored by the app to Quixxi with the following method: In oder to check them:- Click on your app box -> “Supervise” -> “Devices/Users” -> select “Data” view in the top right corner -> choose the user -> go at the end of the line and click on “View Details”

- In the next screen scroll the page till the end and click on “Show Preferences” button
Appendix A – a snippet for asking Dangerous Permissions
If your app is targeting Android Marshmallow or higher [“targetSdkVersion” in your “build.gradle (Module: app)” file >= 23] to get the user email you need to request some permissions at runtime. In fact you will need to have the “android.permission.GET_ACCOUNTS” permission granted from CONTACTS permission groups. We recommend showing the user an explanation before presenting the permission prompt Following is the sample of requesting CONTACTS permissions at runtime:- Create a unique code for the permission in the Activity:
- Check for the permission if granted already or request for the permission:
- Handle the permissions request in your Activity as follows:
ANDROID ANALYTICS SDK – Quick Start Guide
Summary
This document describes how to integrate the Quixxi Analytics SDK into an Android application. The implementation of Quixxi Analytics will allow you to have custom Events and Diagnostics. Please check out our API Reference for more detailed information about this SDK.Creating the Analytics SDK on Quixxi Portal
- If you don’t have yet created the container for your app in Quixxi Portal create one using the “Add New” button, otherwise go directly to point 3.
- In the “Create your app” dialog give a name to your application and click “Continue”
- Click on the newly created app,choose “Control” in the header tab and then “Package” in left side menu.
- Click “Add Platform” and choose Android as platform. Analytics framework in the “Select modules” section should already come preselected.
- Give the same package name you used for this app in Android Studio and click “Start Packaging”.
- Now Quixxi will pack Analytics framework and notify you once it gets completed.
- Click “Download Library” to get the file to integrate in your project. Details for this point will be fully covered in the next section. The package received contains three files: a) a “Readme.txt” file containing the instructions and the AppGUID b) the “QuixxiLibrary.aar” c)the Android Studio plugin “QuixxiPlugin.jar” for Linux-based operative systems. It will be needed only for Quixxi Injected Events [and Patch]
Steps to integrate Quixxi Analytics SDK into an Android app
After downloading the Analytics SDK for the app let’s see how to integrate it into the Android Studio project and have custom Events and Diagnostics as in the sample app- In Android Studio go to “File” -> “Project Structure…” -> click the “+” in the top left corner -> “Import .JAR/.AAR Package” -> “Next” -> select “QuixxiLibrary.aar” -> “Finish”. Please double-check that this step was correctly performed controlling that the “settings.gradle” file of your app shows a line like the following or add it to fix this step:
- After importing the QuixxiAnalytics SDK, click on “File” -> “Project Structure…” -> select “Dependencies” tab-> click the “+” in the top right corner -> “Module Dependency” -> select “:QuixxiLibrary”. Again, please double-check that this step too was correctly performed opening your ”build.gradle (Module: app)” file. You should already find [only] one of the following lines in the list of “dependencies”, else please add the one corresponding to your Gradle version:
- AThese are the permissions to be requested in your Android Manifest:
Initialising the Quixxi Analytics SDK
First of all add the following import to your project: Now let’s focus on the onCreate() method of your launcher activity. Debug Logs from Quixxi Analytics SDK can be optionally activated inserting the following line: Let’s initialise the Quixxi Analytics SDK by adding: If you want to store the user position you can retrieve latitude and longitude coordinates on your own and then call: The location data provided with the preceding API will be displayed on the map in Quixxi portal. To access it click on your app container -> “Control” -> “Devices/Users” and scroll down till the end of the pageSending events
Once the Quixxi Analytics library is fully initialized you can push events to the Quixxi portal with one of the following methods: where:Example
Sending crash reports
Quixxi Analytics SDK integration will automatically file on the portal all the exceptions happening in your code. This will happen without adding any API to your code. Moreover you will be able to access the debugging files that will help you troubleshooting the issue – e.g. Stack Trace, Logcat, etc. – exactly as you would be able to do with your test deviceSending and checking Shared Preferences
You can push the shared preferences stored by the app to Quixxi with the following method: In oder to check them:- Click on your app box -> “Control” -> “Devices/Users” -> choose the user -> go at the end of the line and click on “View Details”
- In the next screen scroll the page till the end and click on “Show Preferences” button
- you need to update the user email with a newer one
- you may not want to retrieve the user email via Quixxi but with your own procedure
- you want to change the user’s email ”unknownuser@unknown.com” which is the default value shown on Quixxi portal when the user denies the Contacts (android.permission.GET_ACCOUNTS) permission required by Quixxi Analytics [actually by Android] to perform this action. This is particularly true if your app doesn’t really need it to perform its tasks
- Create a unique code for the permission in the Activity:
- Check for the permission if granted already or request for the permission
- We already saw that the Library previously downloaded from the portal contained an Android studio plugin “QuixxiPlugin.jar” and a “Readme.txt” file.
- Open Android Studio and select File ->Settings ->Plugins->Install plugin from disk… and choose “QuixxiPlugin.jar”. After clicking on “OK” please restart Android Studio as suggested.
- Now you can see a Quixxi icon in the toolbar which means that the Quixxi plugin was successfully installed.
- Generate your APK by Build -> Build APK and click on Quixxi plugin in Toolbar.
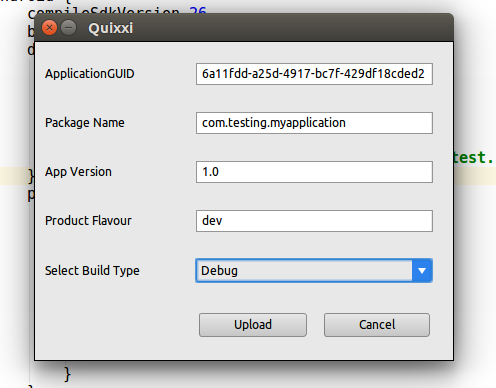
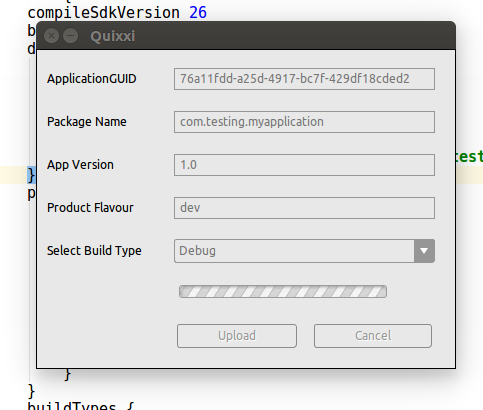
- Copy and paste your AppGuid (as already said it is available in “Readme.txt” file or – more quickly – from the final part of the portal webaddress for the specific app), fill the Package name, app version, choose Product flavor (if any) and finally select build type (debug or release). Once done click “Upload”.
- Quixxi plugin will extract the APK methods and push them to Quixxi Cloud
- In the Quixxi portal choose “Control” in the header tab and select “Injected Events” in the left side menu.
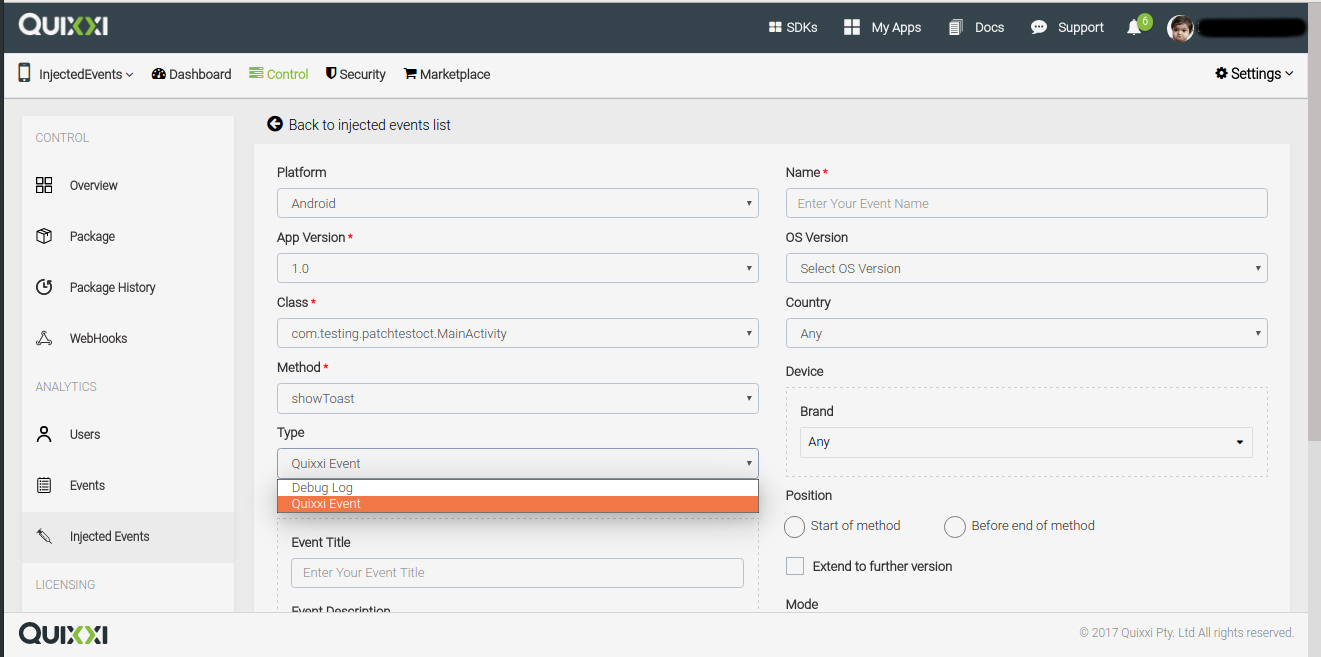
- Click “Add New” button and choose your target app version.Now select either “Debug Log” for log event or “Quixxi Event” for pushing a Quixxi Event from your live application.
- If you want to inject a Quixxi Event in any of your application’s method then choose “Quixxi Event” in “Type” dropdown and provide appropriate “Event title” and “Event Description”.
- Provide a unique name for the event in “Name” and choose your exact audience based on filtering “OS Version”,”Country”,”Brand”,”Model”.
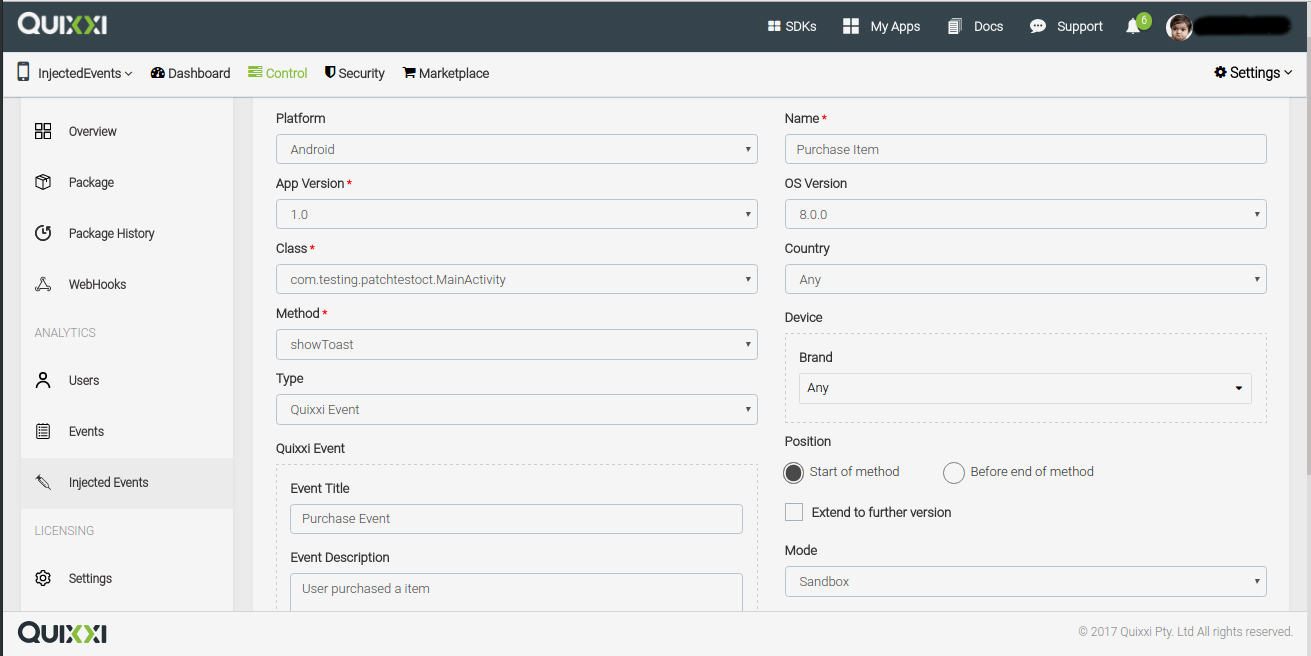
- Also, you have options for injecting event on start or end of your target method and for this option check either “Start of method” or “Before end of method”.
- Check “Extend to further version” option if you want to inject events in further released app versions.
- Choose “Sandbox” to test inject events in debug mode or “Production” to inject events in the live application.
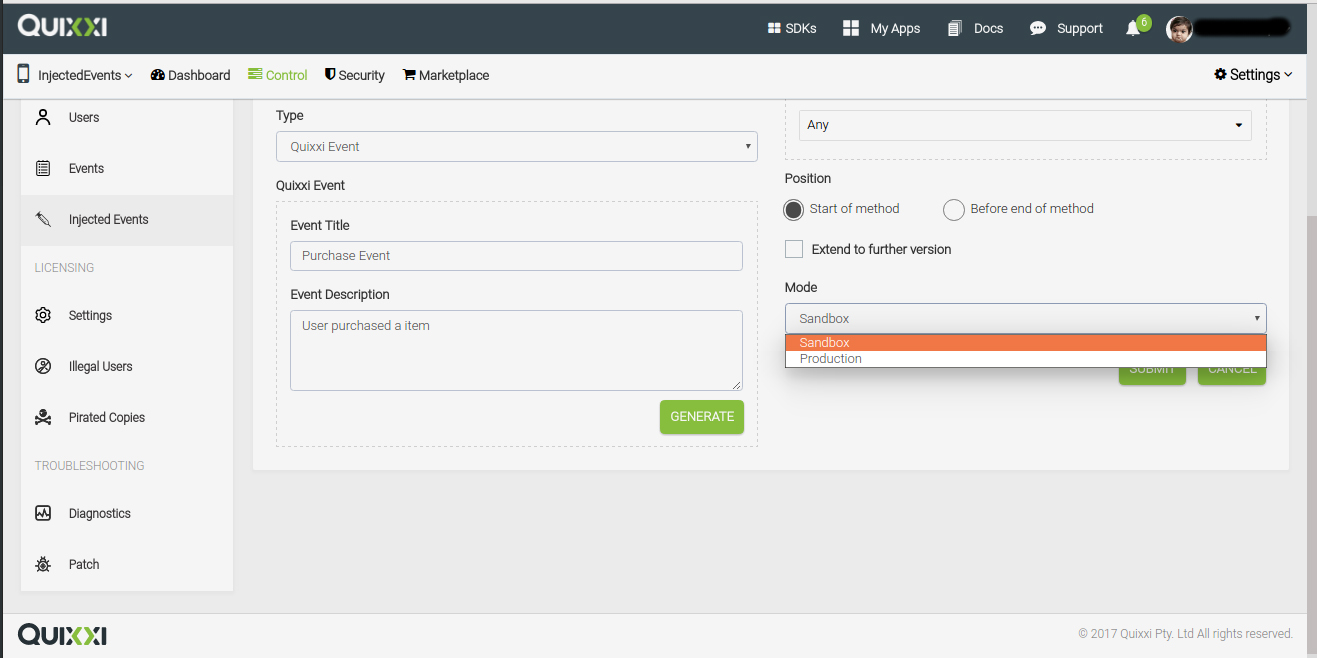
- Now click “Generate” button to generate a Injected Event for your application’s method and click “Submit” to push it to your application.
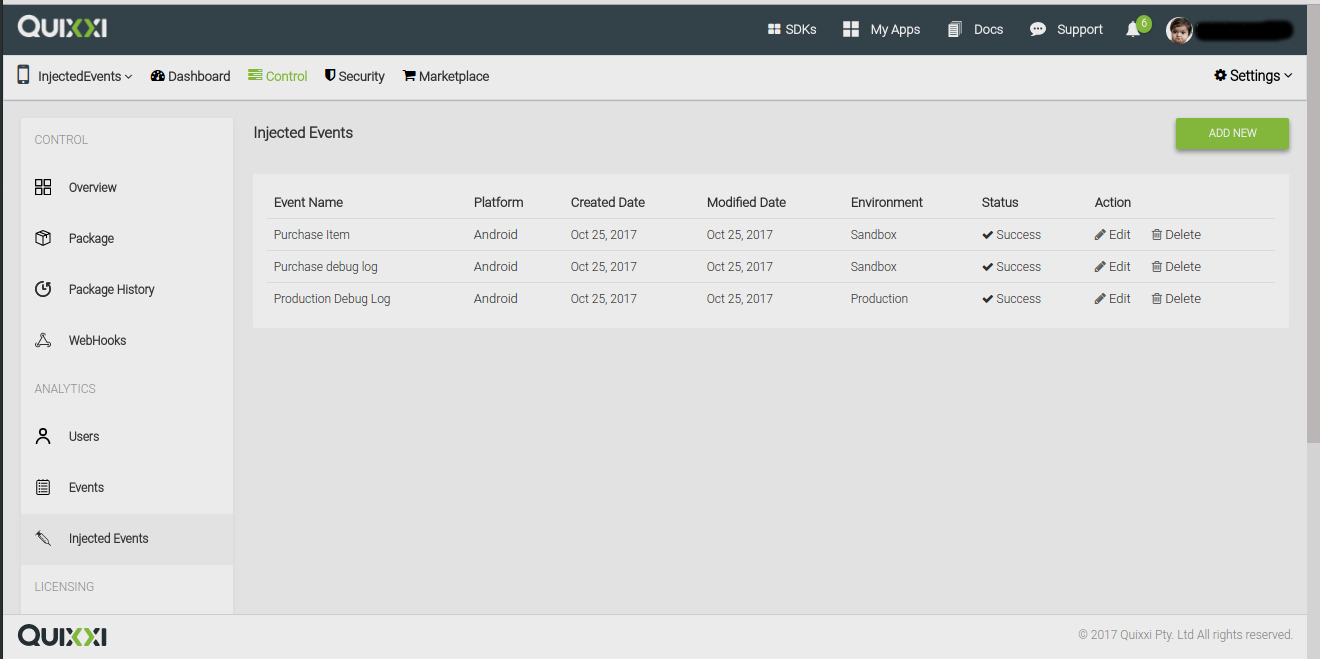
- You can see the history of injected events in Injected Events list.
Updating the user email
Quixxi basic functionality is in general already able to automatically retrieve the user’s email. This API comes to cover the following scenarios:Once you have the email you can update the user profile calling the following API:
Runtime Permissions
If your app is targeting Android Marshmallow [targetSdkVersion: 23] or higher then you need to request some permissions at runtime. Quixxi Analytics needs Contacts (android.permission.GET_ACCOUNTS) permission. We recommend showing the user an explanation before presenting the permission prompt.Following is the sample of requesting CONTACTS permissions at runtime: